 Have a wonderful Christmas with all your loved ones and try to eat as many cookies as you can - CU again after the holidays!
Wednesday, 24 December 2008
Merry Christmas!
Have a wonderful Christmas with all your loved ones and try to eat as many cookies as you can - CU again after the holidays!
Monday, 22 December 2008
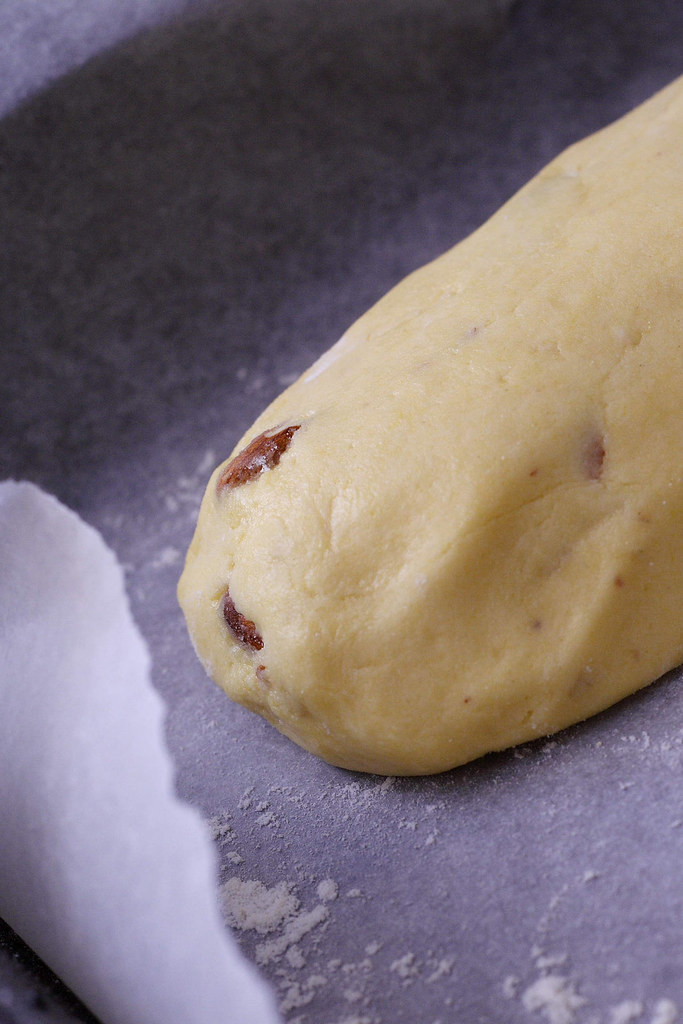
Biscotti - definitely twice baked
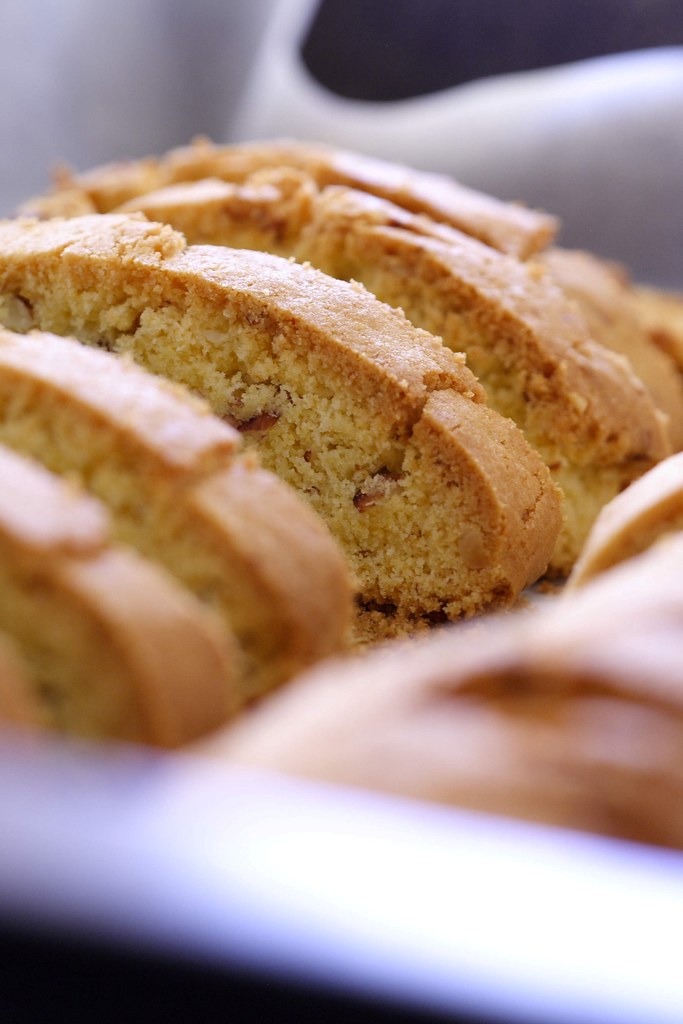
Twice baked - and I mean it! And that's got nothing to do with the regular procedure to bake them, slice them, and then return them to the oven for added crunch and a golden glow.
Having seen lots of biscotti recipes in blogland, I wanted to know if they were really that good. My only encounter so far had been the rock-hard store bought kind that almost cost me a tooth. So, one of these days, I decided to give them a go. However, these biscuits turned out to be not quite as easy to make as I had thought. Not willing to be conquered by some cookies, I decided to start again a few days later, albeit again with mixed results.
But let's start with the first batch. Emerging from its first stint in the oven, it looked just perfect - from above, that is. Once I had the logs sliced up, I noticed that I almost burned the bottom sides. Cursing under my breath - it clearly must be the oven's fault - I returned them to the heat but carefully laid them out side wise as not to brown the bottoms any further.
 For the second batch, I decided to turn down the heat and use the fan-bake setting. But disaster struck once more. When I took the logs out of the oven - pale golden but with darker edges - to be sliced up for the second browning, it turned out that this batch wasn't even done all the way. I quickly returned the uncut logs and peeped anxiously through the oven door. Luckily the baking powder was still doing its job and the logs rose some more. However, a little too much as it turned out. When fully baked, this batch with its cracked surface and less than smooth texture had a rather "rustic" charm to it - at least that's what I think smart people call their baked goods that aren't picture-perfect...
Taste-wise though, I almost preferred the charred batch. The over-the-top caramelization of the crust added more depth of flavour. Therefore, a third batch is in order some time soon - once I'm done with all the Christmas baking - and then with a double-layer of baking sheets!
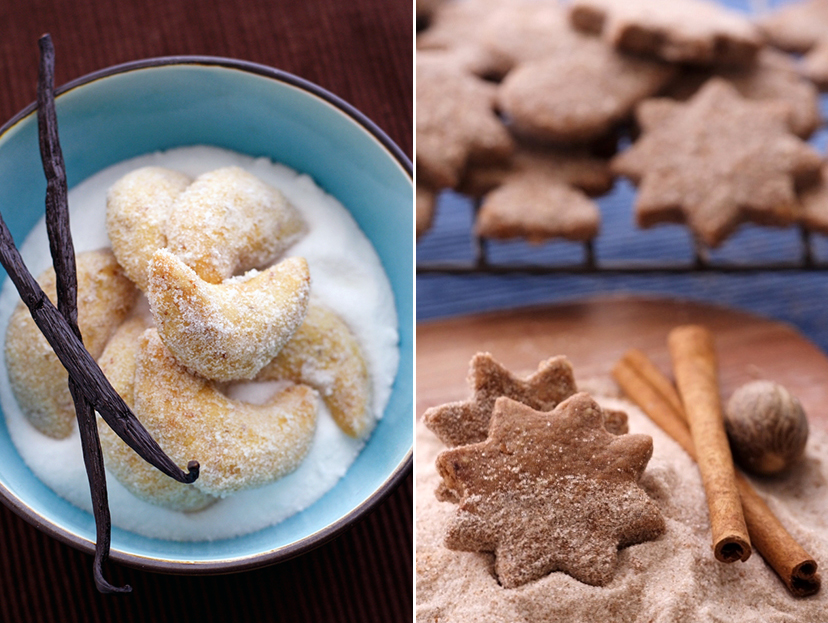
Almond Biscotti
I started out with a recipe from delicious days and kept to its instructions but made a couple of modifications regarding the ingredients, most notably the addition of maize flour.
The ingredients
90g unpeeled almonds, partly whole and partly chopped
100g butter, softened
100g caster sugar
50g lemon caster sugar (in a jar, mix sugar with lemon zest and let it sit for a few days)
2 eggs
5 drops of bitter almond essence
pinch of salt
200g flour
80g fine maize flour
Wednesday, 17 December 2008
Granola Trifle - by no means a trifle
As Y has put it so well, I have been on the longest short trip ever - and now that my in-laws are back in Germany and the most urgent of my work projects are finished, I find myself with only one batch of Christmas cookies baked and only one present bought so far - and Christmas is only a short week away...
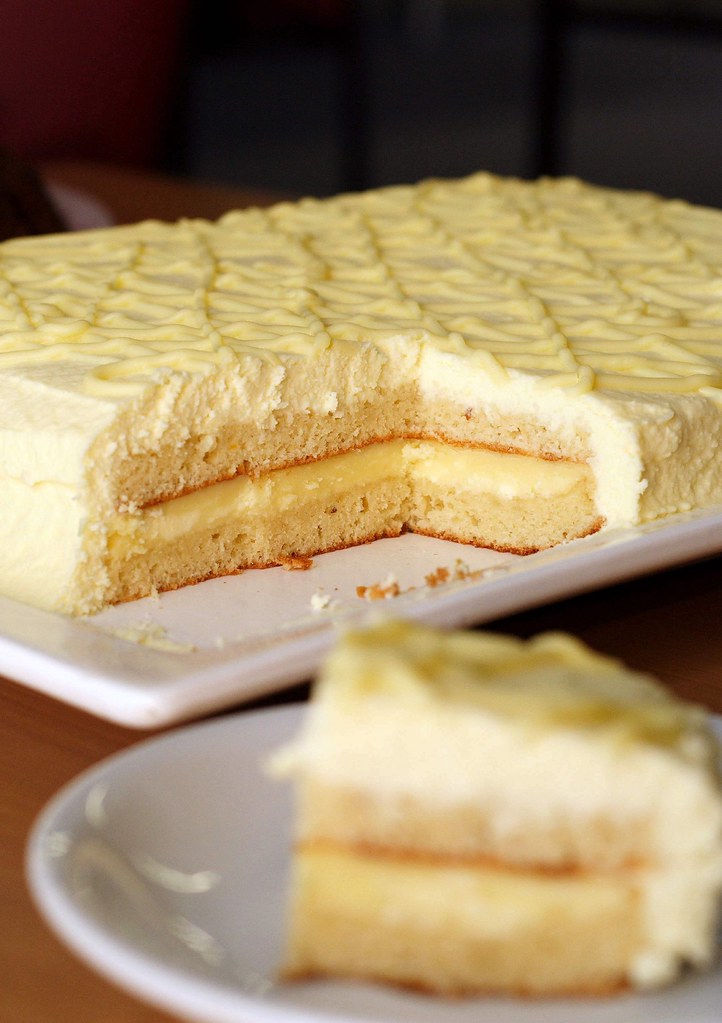
Anyway, let's get back to the riddle: Tanna was pretty close, however, it's not a pecan, it's an almond! That said, the following recipe contains pecans as well as you can see..;-)
When thinking about the ending year 2008 in food-related terms, one thing comes to my mind: it was the year of the seemingly endless quest to make my own granola. Sounds like a pretty simple affair, doesn't it? Well, I'd better not say how many batches of substandard granola I had to eat before finally coming up with the winner recipe. Not that there aren't enough tried-and-true recipes for this breakfast staple out there. There are plenty and I've googled for them all.
But when something looks so deceptively easy to do, I can't help myself but tinker with every single one of them. Which resulted in many batches of either overcooked, not-so-tasty or just plain bad granola. In the end, I loosely based my recipe on the two granolas you can find at Butter Sugar Flour; and at long last, I finally figured out how not to burn my granola with my very uneven oven, as well as how not to make it either too dry, too wet, too sweet or not sweet enough.
Once that was done, I could finally reward myself with a beautiful granola trifle - inspiration courtesy of Zarah Maria - with homemade quark and store-bought apple sauce. Hey, there's only so much you can do yourself at a time...
My Granola
The dry ingredients
3 cups of rolled oats
1 cup of almonds, partly chopped
1 cup of pecans, partly chopped
2 tsp of cinnamon
The wet ingredients
1/4 cup grape seed oil (or any other oil of your choice)
1/2 cup runny honey
1/2 cup apple sauce
2 tbsp vanilla extract
pinch of salt
1
Mix all the dry ingredients in a big bowl.
2
Lightly heat the wet ingredients in a small pot and stir to combine. Mix into the dry ingredients.
3
Fan-bake at 120 degrees Celsius for an hour until golden and crispy. Don't forget to stir every 10-15 minutes.
Keeps in an airtight container for several weeks.
The source
Inspired by Butter Sugar Flour
Monday, 17 November 2008
CU soon!
 I'm going on a short trip and - of course - didn't manage to put up a new post before that. However, I've got already something lined up for you. Can you guess what it is about..;-)
Friday, 7 November 2008
Time to change...finally

Had it not been for Nora's comment, I would have promptly forgotten about this blog's third birthday - it does seem to be some sort of recurring theme... Especially when yesterday's post would have been quite suitable to double as anniversary post....ah, never mind!
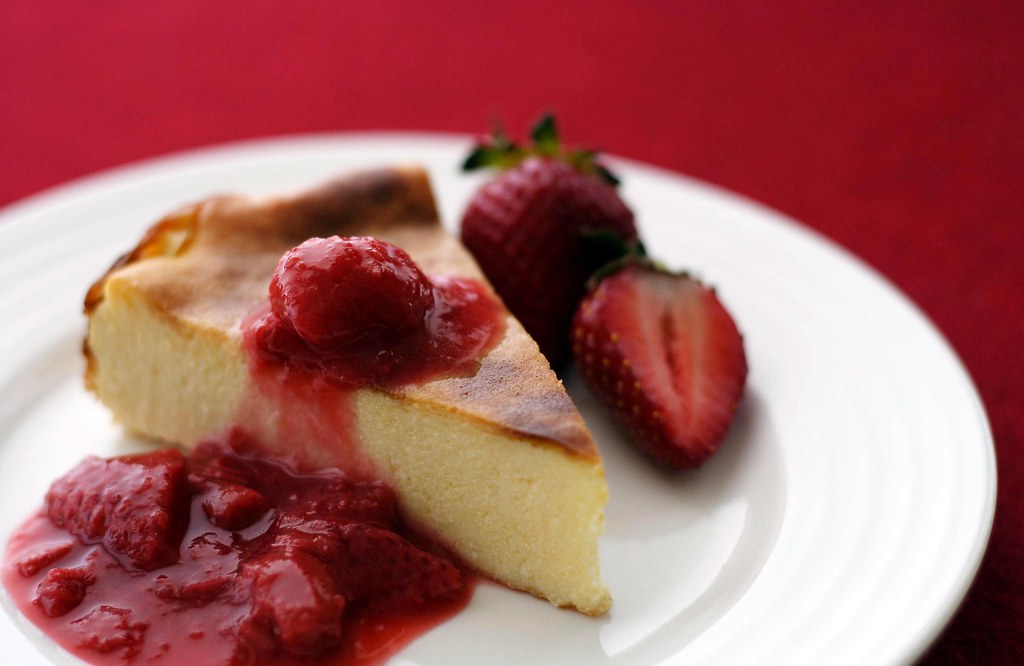
Being time-poor as usual, any culinary adventure fit for an anniversary was out of the question, so I decided to finally do something about the long-planned make-over of this blog. Yes, that's right, it was planned for a long time with designing new headers, fighting with the template, trying to understand Html and CSS (still not much of an advance in that respect) and all the cursing that comes with it. However, I didn't really like any of my earlier attempts. The day-long shooting for the perfect new header photo somehow never came - and the project was abandoned - shame on me...
So, on a whim, I decided to turn yesterday's cheeseckae photo into my new header and played around with the new blogger-template (luckily it worked out this time). There are still a few odds and ends to fix up - haven't figured out how to change my column width or how to convert to three columns and many more things like that.
However, this blog got new clothes to start afresh into its third year! Feel invited to come along with me and please tell me what you think of the new look!
Thursday, 6 November 2008
Delicious Stuff from Delicious Days
One fine day, about two and a half years ago or so, my friend Nora introduced me to the wonderful world of foodblogs - guess, I've mentioned that fact before, have I? Anyway, what I might not have mentioned is the sad fact that some food blogs come and some go simply because I'm not able to keep up with all of them - no matter how much I'd love to. However, there's one that I clearly remember from this first awakening and that has stuck with me ever since. I'm sure you know this one already: it's Nicky's Delicious Days - a wonderfully written and photographed food blog from Munich.
During my recent trip to Germany, I had the good fortune to meet up with her for breakfast and, it being the final days before the release of her first cookbook, I also had the chance to get a sneak peak into it! I probably asked her all the questions about it everyone was asking as well..;-) Add to this that we happen to come from the same small town in Eastern Bavaria (with lots of regional specialties) plus the fact that we both experience(d) living abroad and you can imagine one lively conversation!
After having seen her book, it was only a matter of days until I could finally go to the bookshop and get it. However, deciding which one of the recipes to make first took me a while. Reading it from cover to cover first (there's not only recipes but lots of stories to go with them, too) and then leaving through it two more times, I finally had made up my mind that it had to be something sweet. Well, maybe not so surprising after all, is it?
Being an avid cheesecake lover, I decided to try Nicky's cheesecake that comes from her favourite cafe in Munich (definitely need to go there next time...) and it was every bit as promised: creamy, moist, and with a little tang from lemon juice. Usually, I would make souffle-like cheesecake batters with stiff meringue that would naturally crack and sink upon cooling. So if I need to get a sturdier cheesecake that will stand up without tasting of flour or cornstarch, that's the way to go!
And in case you wondered, it didn't take me quite as long to determine what to try next..;-) So far, we've had the apple-and-bacon mini-quiches that got rave reviews as well as the goats cheese salad with green nut-dressing - which my vinaigrette-drinking husband (a trait he incidentally shares with Nicky) heartily approved of.
Next in line was the oven-baked pancake with sauteed apples (un-sauteed strawberries and nectarines in our case). Luckily this recipe proved to be even more than foolproof: Running out of time, I didn't make four separate pancakes as specified but dumped the entire batter into my Dutch oven to crisp up on the stove and bake further in the oven while we were wolfing down the main course. Luckily, the recipe stood up to this rather unconventional method and I might have even turned it into something clafoutis-like - lucky me, I've always wanted to try this classic French dessert.
There's still so much more to try...
Sorry, no recipes this time, you might just have to go buy the book!
PS: The original cheesecake recipe isn't crustless but when serving cheesecake with an accompaniment like this strawberry-rhubarb compote, I prefer to have it without the shortcrust.

Thursday, 16 October 2008
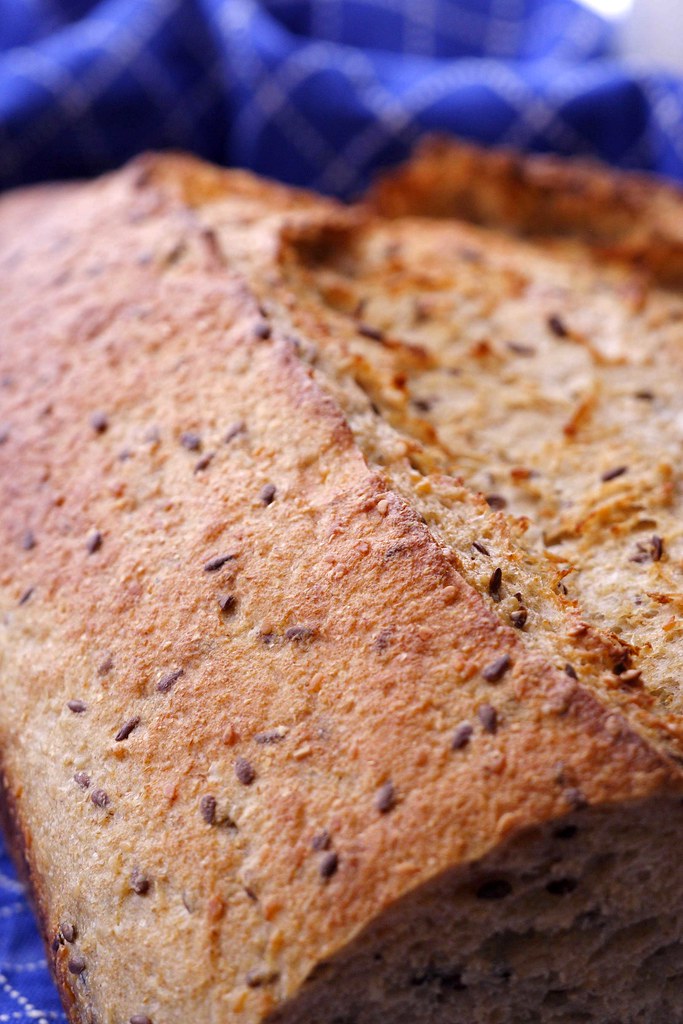
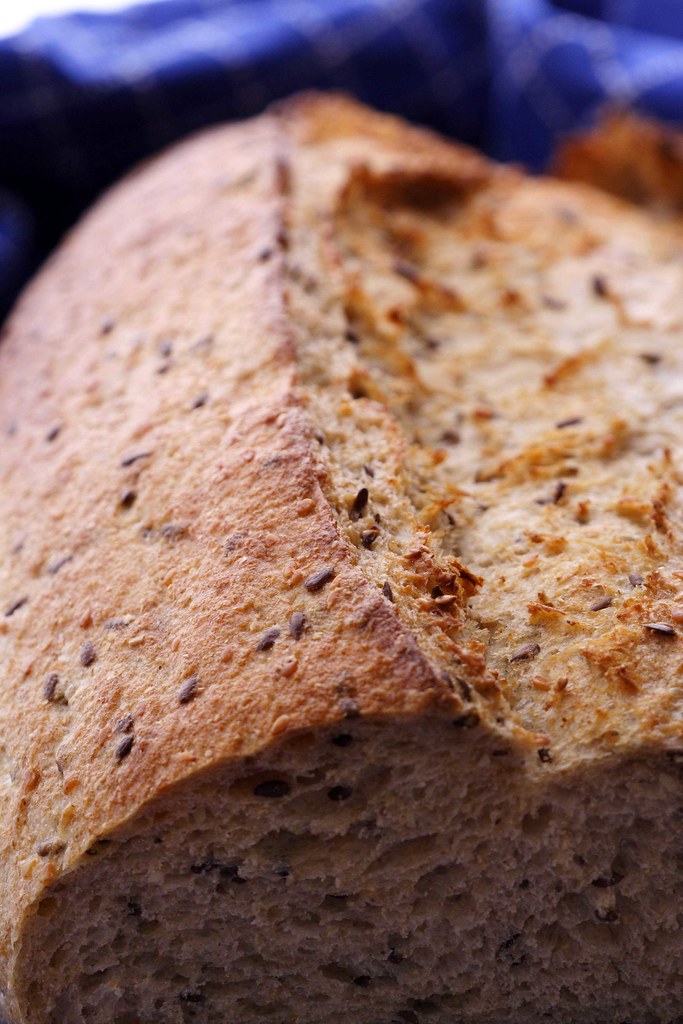
World Bread Day - German Seed Bread
People, World Bread Day is almost over (at least on this side of the earth) and I'm loaded with work but didn't want to miss out completely on this event that's created by the lovely Zorra of Kochtopf and that's very dear to me!
 So this is going to be a short one. During my recent trip to Germany, I had plenty of stuff on my to-do list. Next to "meet as many friends as possible", there was "eat as many German specialties as you can possibly stomach". What shall I say, I really worked hard on that one...
Of course, one of the most memorable things I ate (apart from an incredible number of sausages and cured meats) was a certain type of bread - full with seeds but not dense and heavy at all. Still chewing, my better half requested this particular loaf to be recreated in Sydney and who am I to deny that..;-)
I started off with this recipe from Petra of Chili and Ciabatta and made the changes following below. For non-German-speakers, just a rough summary of the procedure: let the soaker rest for 3-4 hours (covered), mix the dough, let rise until doubled, degas it while stretching and folding it 2x, shape into a loaf, let rise until nearly doubled, and bake at 220 degrees Celsius.
The dough is relatively moist and rather sticky but not too hard to work with (stretch & fold helps a lot to get a good dough structure). My version produces a soft but hearty crumb (due to the different kinds of grains and seeds) and a compact but rather soft crust. It goes well with honey, jam, and mild cheeses.
PS: The first time I made it with a mixture of sourdough and instant yeast as below, the second time around I used sourdough only but can't remember for the life of me if I therefore upped the amount of sourdough or not. Hence, I need to make it again to find out...
Seed Bread
The ingredients
Soaker:
45g flax seeds
45g rye flour
35g sesame seeds
35g rolled oats
11g salt
206g boiling water
Final dough:
180g water or whey
all of the soaker
250g wheat sourdough, 100% hydration
1tbsp honey
360g bread flour
30g wheat germ
1 tsp instant yeast
1 tbsp malted barley flour
up to 4 tbsp whole wheat flour (depending on the stickiness of the dough)
The source
Adapted from Petra of Chili&Ciabatta
Friday, 10 October 2008
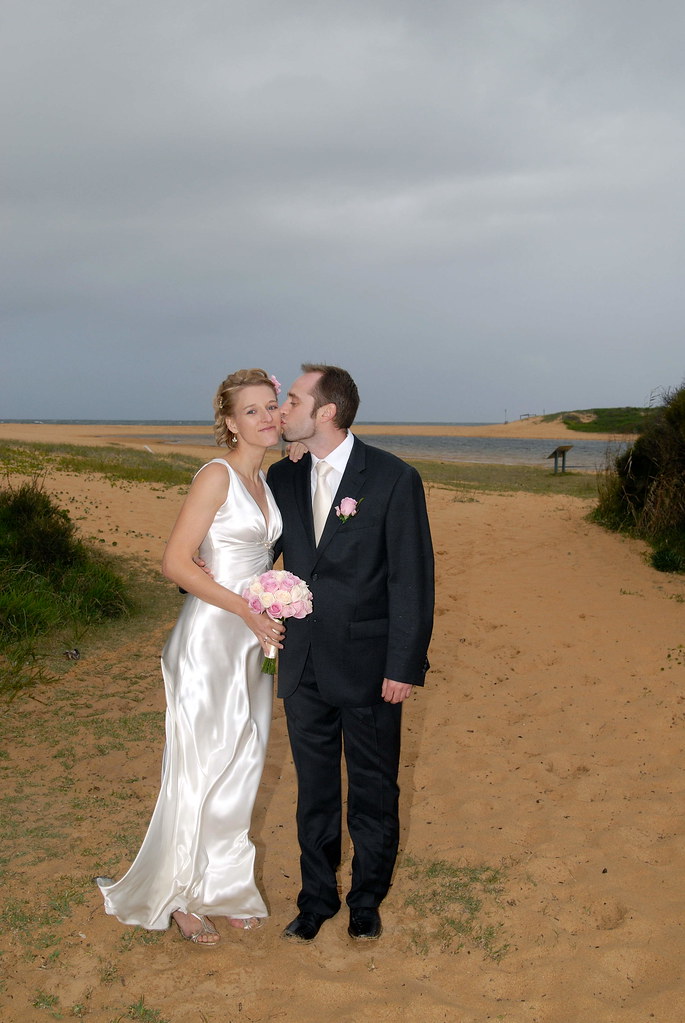
Wedding Wrap-Up
In case you're currently contemplating to get married - I can honestly recommend doing it not once but twice. But before you cry out in dismay, I'm talking about doing it twice with the same guy..;-)
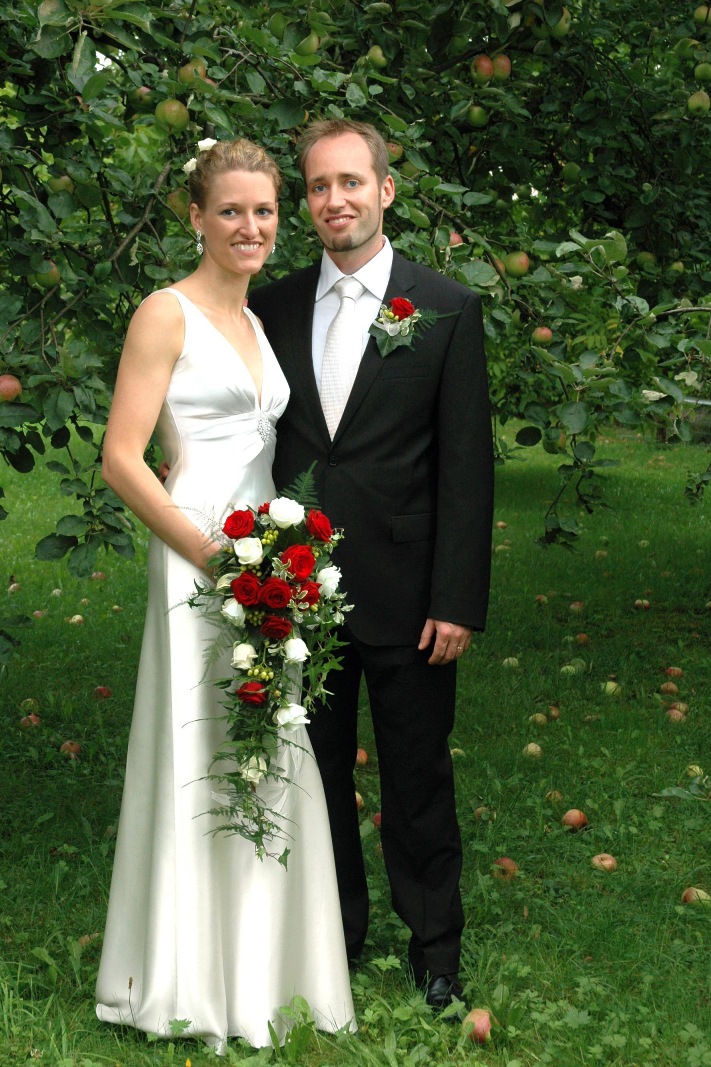
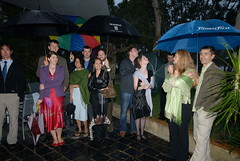
This April T and I tied the know in Copacabana Beach (not in Brazil but on the lovely Central Coast of NSW) for the first time; and this September we did it allover again in Germany - accompanied by our families and relatives (and again lots of friends) who hadn't been able to come to Australia.
Although the settings of the two weddings could not have been more different (first just a few friends, an outdoor wedding with a barbecue reception and now about a 100 guests, a very festive ceremony in a grand Gothic church, and a four-course-dinner plus a huge wedding cake buffet) a few things remained the same (apart from wearing the same dress twice..;-)
Both times it was a very relaxed celebration - it was all about having a good time with lovely people while eating and drinking as much as possible. Much to my own surprise, it was just as exciting the second time around. Until three days before, I had managed to convince myself that I was a total pro where getting married was concerned so no need for butterflies in the stomach or any such nonsense. After all, we had been legally married for almost half a year already, right? However, shortly before the wedding, we decided to write our own vows just like for the first ceremony and to learn them by heart this time which was enough for me to finally get nervous again...
But most importantly, listening to my man promising to always be my friend, companion, and lover - it was definitely enough to make me get teary allover again...
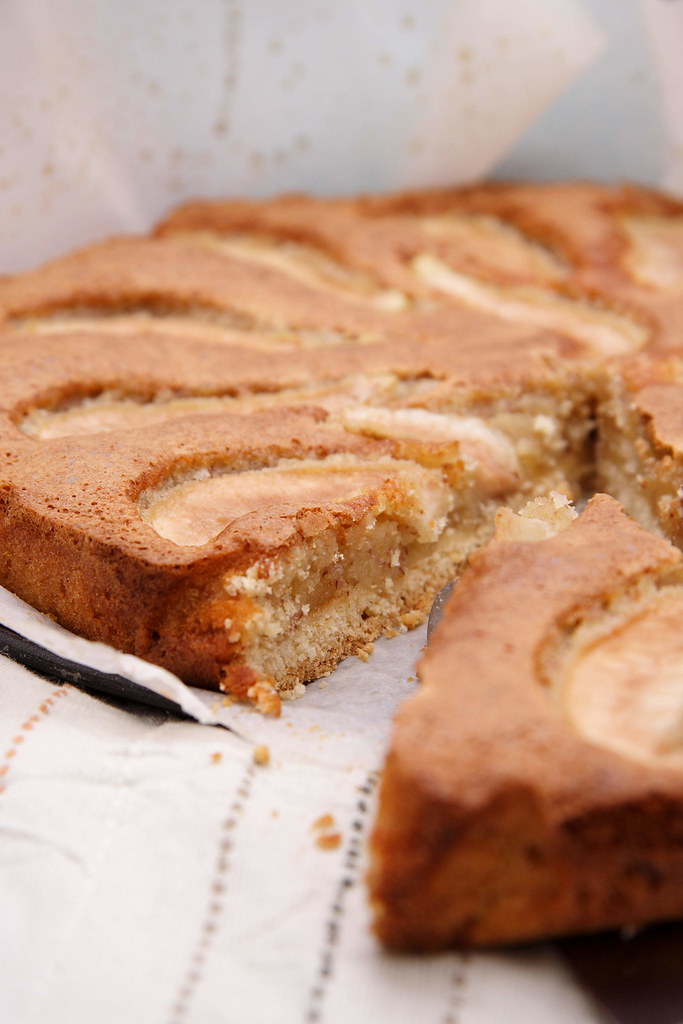 PS: In case you wonder, what our wedding has to do with the tart I'm blogging about today - my lovely workmates from Sydney had sent me off with a wonderful bunch of flowers. So once I was back in Sydney, I wanted to bake something nice for them. Thinking that I had enough shortcrust pastry in the freezer, I quickly decided on a frangipane tart. However, after defrosting the pastry, I realized that the two portions weren't the same thing - one was a parcel with streusel topping. Hence this rather unconventional take on a frangipane tart which hopefully still qualifies as an entry for Kochtopf's food blog event "Quiche, Tart & Co"..;-)
Note to self: Thou shalt not only label your freezer bags but also read the label before proceeding.
Emergency Frangipane Tart
The ingredients
Your favourite shortcrust pastry to line a 24cm-spring form pan (I use this one)
2 small eggs
50g caster sugar
a few drops of rum essence (optional)
60g marzipan, grated
100g streusel topping (like this one - freeze the remainder for another time)
50g almonds, ground
1 pear, peeled and cut into thin wedges (add more fruit if you like)
1
Either grease your spring form tin or line it with parchment paper. Press the pastry into the tin, forming a small rim (if you happen to have enough pastry, that is...). Prick with a fork a couple of times and fan-bake at 150 degrees Celsius for roughly 10 minutes.
2
Using a hand-held mixer, beat eggs, sugar, and rum essence (if using) until pale, thick, and foamy.
3
Add ground almonds and streusel topping and fold in gently. You don't want to destroy the foamy consistency.
4
There are two possibilities for adding the marzipan:
You either grate it into the bowl where it will most likely clump together again - in this case try to mix it in as gently as possible. Or you pour the filling into the tart case and grate the marzipan directly on it (I'll try this method next time).
5
Cover with pear slices and fan-bake for another 30 minutes or until crispy and golden-brown on top.
The source
My own invention - out of necessity..;-)

Thursday, 25 September 2008
Here I am again... with Broad Beans!
 Poah, that's been a long absence... Now I'm definitely happily married and will be writing more about our second go once I've got the photos - let me just just say it was w-o-n-d-e-r-f-u-l! (Meanwhile you can read about our first wedding here.)
After a long but oh-it-seemed-so-short stay, we had to kiss our families and friends good-bye and were off to Sydney. While living in this preparing-for-and-then-getting-married-bubble, one could forget that elsewhere life goes on, you're just too busy to notice. That's also true for the food blogging world - I've had a lot of catching up to do! Always amongst the first to check is Nora's Life's Smorgasbord. I had already eyed her lavender shortbread - full of envy, of course, as I always forget to look out for culinary lavender - no matter how often I've longingly read blog posts about the creative use of this herb.
This time I read loads of stuff about broad beans that sounded utterly appetizing. What's more, Nora said that the season for broad beans is almost over! That's why I decided to do something about it now instead of saving the recipe for later (which usually means much, much later) . Off I went to the shops to buy broad beans, mint, and pecorino, and made myself a simply wonderful dinner. Granted, the whole shelling business does take a while but on the other hand it lifted my spirits to do something elaborate just for myself. With my new/old husband away on a business trip, dinners aren't such an enjoyable thing - however, these broad beans totally made my evening!
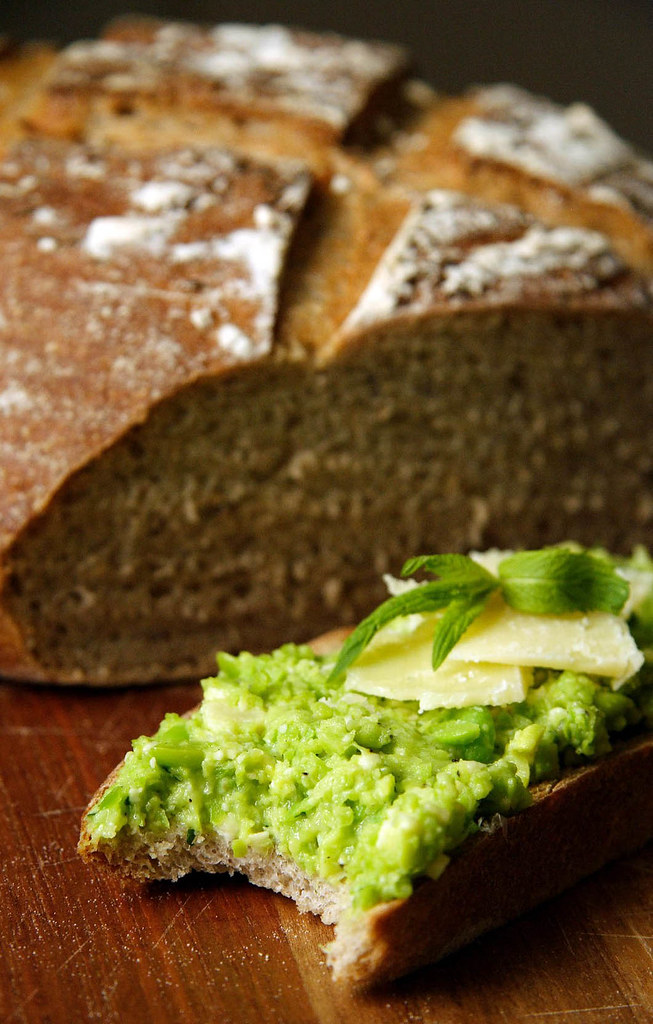
PS: Nora provided three different recipes so no need for me to type it down again (I chose Maggie Beers' version with some lemon juice added and some garlic rubbed onto the sourdough bread after toasting - lovely!). I'd rather tell you about the sourdough bread that was just baking away when I read about how to use it for dinner..;-)
Light Rye Sourdough Bread
 The ingredients
250g water
360g white sourdough, 100% hydration
300g bread flour
100g rye flour
100g wholewheat flour
1.5 tsp salt (or a little more than that)
1 tbsp whole caraway seeds
1
I used my breadmaker for mixing the dough and letting it rise. The first rising was about 3 hours (the bread maker provided some warmth during the first hour). At the end of the rising time, the dough had a bit more than doubled.
2
Take the dough out of the bread maker and turn onto a lightly floured work surface. I treated it to a round of stretch&fold (for a stronger texture) and then shaped it into a round loaf.
3
Place the loaf seam side-up into a floured proofing basket (or a bowl lined with a floured tea towel). Cover and let rise until well doubled in size. This took roughly 2.5 hours. To be sure, make a light dent into to the surface of the loaf. As soon as the dough doesn't spring back completely and still shows a little dent, the loaf is ready for baking.
Meanwhile, preheat the oven with a baking sheet or pizza stone to 220 degrees Celsius (I usually use the highest setting available as I will always lose some heat during steaming).
4
Carefully unmold the loaf onto a bread peel or an upturned baking sheet (covered with parchment paper or sprinkled with cornmeal). Slash in a criss-cross pattern.
Let the loaf glide onto the hot baking sheet/pizza stone and quickly shut the door. Open once more and splash a cup of water onto the bottom of the oven - be aware of the hot steam! Again, quickly shut the door to keep heat and moisture in.
5
Bake at 220 degrees Celsius for 30 minutes. Then change to 200 degrees fan-bake for a further 15 minutes. The fan will get the remaining moisture out of the oven for a crisper crust. If you want a thicker crust, bake a little longer at 220 degrees before changing to fan-bake.
6
Let the loaf cool completely on a rack before slicing.
The source
Inspired by Dan Lepard's Barley and Rye Bread
Saturday, 30 August 2008
Starting allover again...
 It´s all so quiet around here... The reason for this is the fact that I will remember 2008 as "the big wedding year"... About ten days ago, I´ve arrived in Germany, went straight to another friend´s wedding and have been preparing my own, second wedding since then. After the first, rather home-made affair in Australia - this is going to be the full shebang with church, lots of family and friends, and - of course - loads of food and wine!
Luckily, most of the preparations have been taken care of by my parents - thank goodness - so things aren´t quite as crazy around here as one might imagine otherwise. Still, there´s plenty of stuff to do and I won´t be blogging very much until it´s all over. Well, who would have thought...
To top it all off, my husband and I will be attending another friend´s wedding before finally heading home again. And we haven´t even been able to go to all the weddings in Australia and Germany we have been invited to this year!
I wish you all a great time and hope to return to blogging as soon as normal life kicks in again!
Friday, 1 August 2008
BBD#12 - Small Breads
 No, I did not throw my wildly growing sprouts into these bread rolls. Although I admit that I was mightily tempted..;-) However, with friends coming over for dinner the other night, I didn't reckon that I should subject them to an experiment with - at best - questionable outcome.
Oh well, I will come up with something eventually. But this time, I decided to rather go with the recipe of a trustworthy blogger. Having seen intricately shaped sacaduros ages ago at Chili&Ciabatta (and always wanting to make them) plus another deadline coming up all to soon - I was set for another installment of Zorra's Bread Baking Day: Aparna of My Diverse Kitchen had chosen "Small Breads" as her topic. Bread Rolls is something I make far too rarely, so I was pretty happy about this theme!
Alas, as you can see, they don't quite look like Petra's. Due to work, I needed to make the rolls the evening before and rewarm them right before dinner. That's why I decided to leave out the crucial ingredient, stupid me.
When shaping sacaduros, you put a cube of butter with a little flaky salt into the middle and fold thin strips of dough over it. While baking these strips partly unfold and get all nice and crispy, thus revealing their buttery innards. However, I was afraid that it would get all soggy when rewarmed and decided to leave out the butter. Without it, the sacaduros unfortunately turned out rather flat.
 On the positive side, I was really pleased with my combination of bread flour and 70 grams of spelt flour for a hearty but still refined flavour.
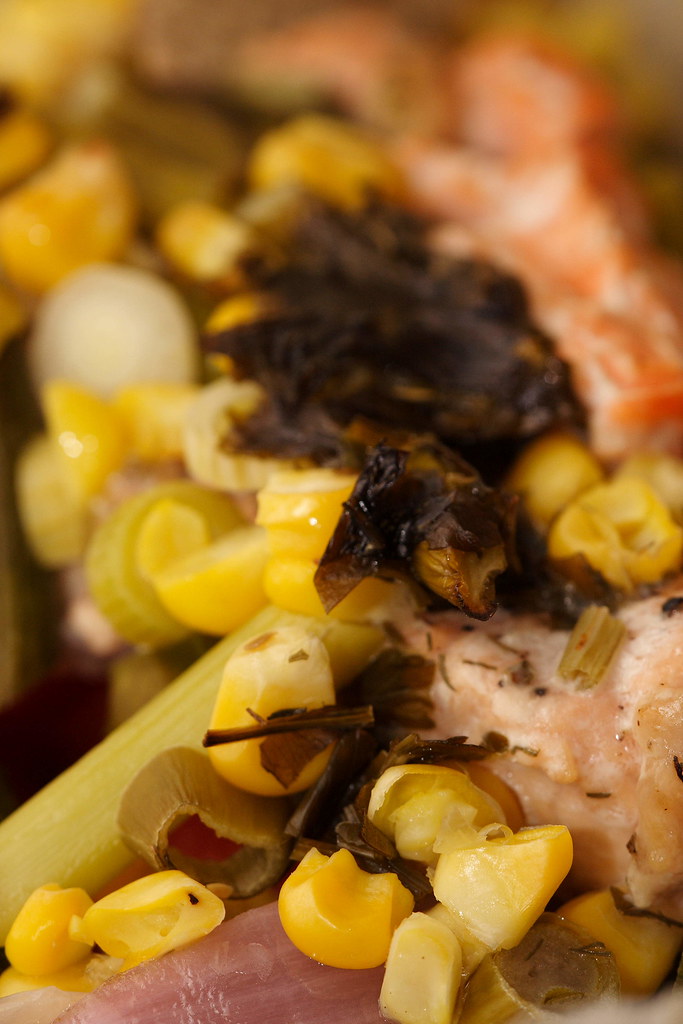
And in case you're interested, that's what we were using the bread rolls for: mopping up the juices from salmon and vegetable parchment parcels. Made with lemon juice and white wine, there was a lot of nice broth to mop up!
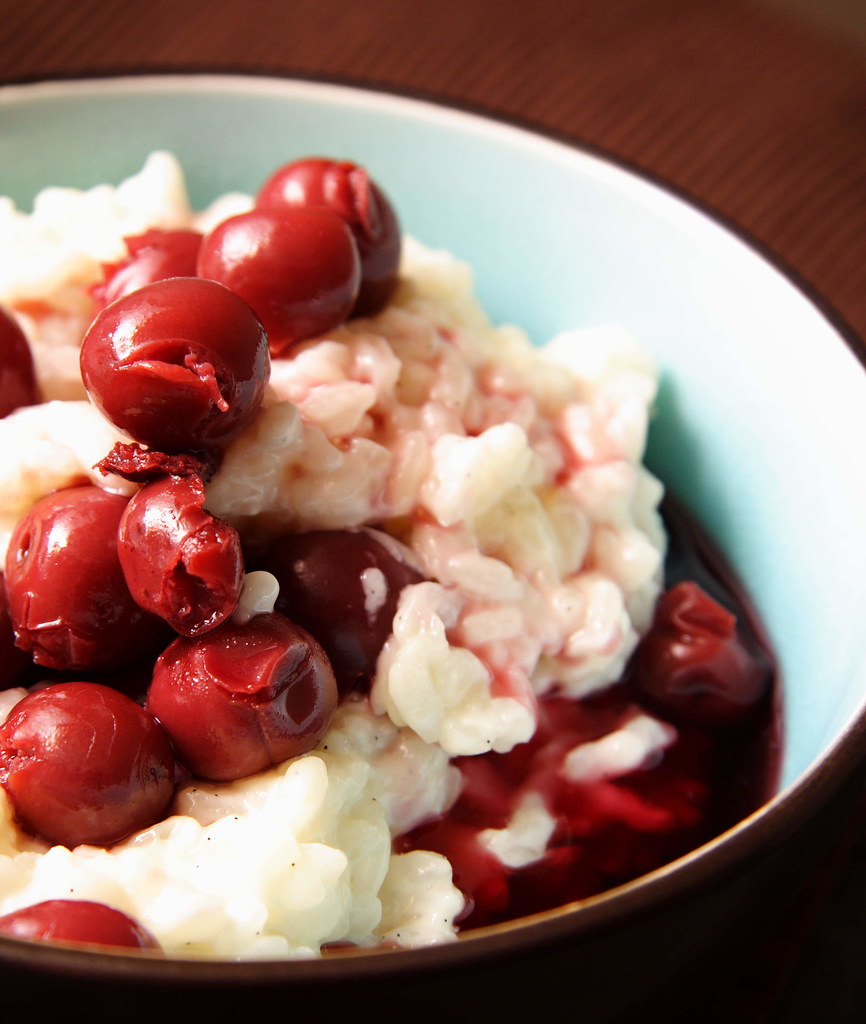
PS: As you know by now, blogging deadlines are not my forte (probably because all my energy is used up meeting professional deadlines...ok, no more excuses). Anyway, today is the national day of Switzerland, and Zorra, missing her homeland, has asked to cook something red, white, or Swiss to celebrate the day. Dutifully, I made rice pudding with canned cherries this week - and took horrible photos of the rather nice rice pudding. That's why I'm posting an old and never published photo of an equally tasty but ultimately more photogenic rice pudding. Enjoy, Zorra!
Sunday, 27 July 2008
Sprouting out of Control

Help! A foreign life-form is taking over my fridge! It might be only a matter of days until it bursts out of the container and decides to invade the next shelf. I don't know what to do with these little critters but still can't make myself throw away something that looks so decidedly alive. Didn't dare opening the lid though - you never know what you might unleash...
It all started with Zorra's Bread Baking Day #11 which made us sprout seeds or grains. At first, I wasn't sure if my rye berries would sprout at all. Then I forgot about the deadline of the event and suddenly these little critters looked like this. I suspected they had started to get mouldy but when inspecting the photos a bit more thoroughly, it just looked like little hairs growing along the sprouts.
With a lot of work looming on the horizon and no idea if the sprouts were still edible or not, I just put them back into the fridge. Being a freelance journalist, I was so busy preparing for and then writing about World Youth Day in Sydney that I again forgot about this little project (sadly, this seems to be a reoccurring theme these days). Now, the last pilgrims have left Australia and these sprouts are still inhabiting my fridge. And I'm still at a loss what to do with them...
Monday, 7 July 2008
Sprouted Rye Berries or how to forget about a deadline
 Sorry - I know this photo is anything but mouth-watering... However, it shows my first ever attempt at sprouting grains. Thanks to this helpful fellow food blogger, I got some much needed advise on this topic. Unfortunately, due to a work project I completely forgot about the little buggers - until they looked like that.
 Having first worried about my rye berries not wanting to sprout at all, they obviously proved me wrong about their ability to jump to life when watered. Little did I know that they would even continue to sprout when placed in a dry container in the fridge. By then, the deadline to this food blog event was almost over and I wasn't sure at all if these little guys were still edible. Frankly, this whole sprouting business is still a bit of a mystery to me... However, if you want to learn more about it, have a look at this!
In the end, I decided to give last month's Bread Baking Day a miss - sorry Zorra - but do check all the truly brave bakers who conquered the topic, sprouting and all! I'll be back with the July edition that doesn't scare me half as much as the last one! Maybe I'll finally learn how to bake perfectly crusty bread rolls!
Friday, 27 June 2008
Buttermilk Cake with White Chocolate and Dried Apricots

Here comes another quick treat with the potential to brighten up a rainy weekend (unfortunately a regular occurrence during winter in Sydney). Basically it's the lucky result after trying to make the best use of a couple of leftovers: A few weeks ago, I had lots of buttermilk after this kitchen project, lots of white chocolate after this daunting affair, plus the weak resolve not to eat too heavy a cake this weekend...
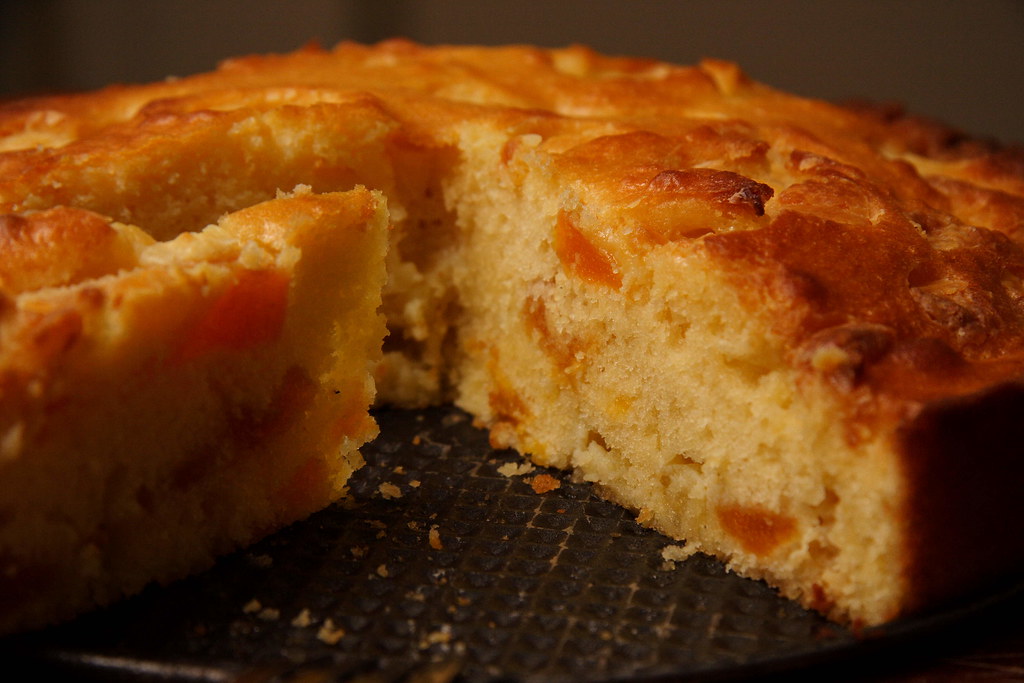
After a quick online research, I used Orangette's version of a buttermilk cake to start out with. The major change was cutting down on the sugar and using more flour and buttermilk at the expense of the butter. Of course I knew that with all my tinkering, the white chocolate would still make for ample richness.
I'm not very experienced in baking with white chocolate and didn't know what to expect. However, this cake exceeded all expectations and proved to be really moreish for everyone who took part in devouring it. The biggest surprise were the white chocolate bits that had touched the pan during baking: They turned into caramelized, crispy, brown bits that were the best part of the cake!
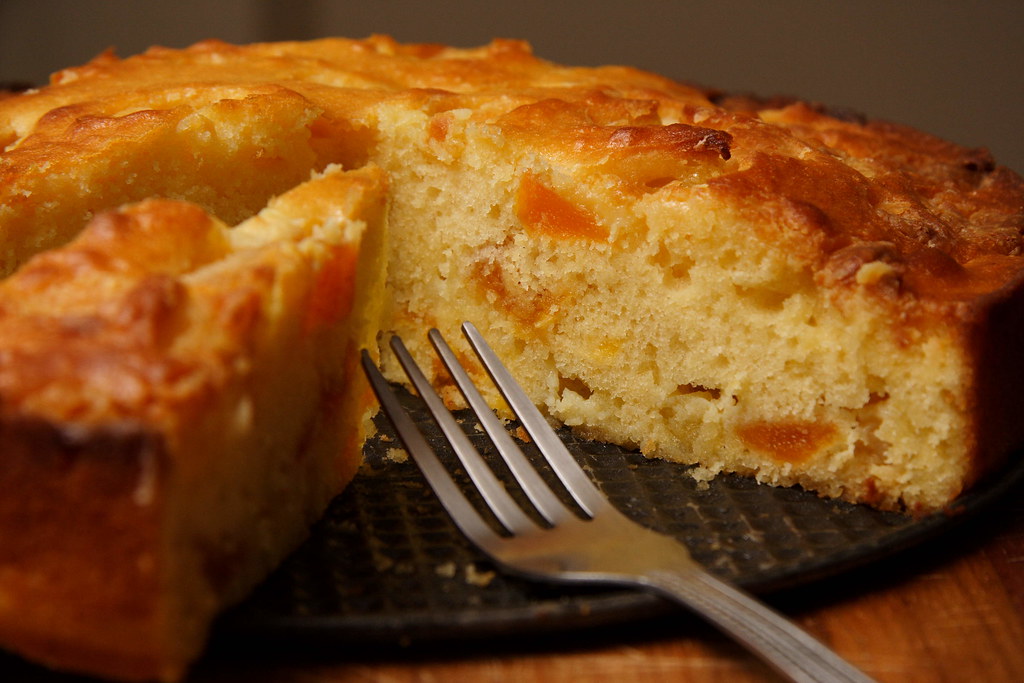
Buttermilk Cake with White Chocolate and Dried Apricots
The ingredients
70g unsalted butter, at room temperature
125g granulated sugar
pinch of salt
1 vanilla sugar
3 large eggs
200g unbleached all-purpose flour
½ sachet baking powder (about 1 tsp)
125ml buttermilk
150g dried apricots, chopped
Lots of white chocolate, cut into chunks (at least 150g)
Briefly rehydrate apricots in a splash of boiling water. Meanwhile, cream butter with sugar, vanilla sugar, and salt.
Add eggs one by one, mixing well in between.
On low speed, mix in flour and baking powder. Slowly add buttermilk - the exact amount might vary according to the size of your eggs. The texture of the batter should neither be liquid nor too stiff (I hope that makes sense...).
Drain apricots and fold in. Fold in half of the white chocolate. Scrape batter into prepared baking tin, 24 cm in diameter). Sprinkle remaining chocolate on top.
5
Fan-bake at 150 degrees Celsius until golden on top and a wooden skewer inserted into the middle comes out clean (30-40 minutes).
The source
Loosely based on Orangette's Buttermilk Cake
The hint
I've also made this cake with fresh or tinned fruit instead of the apricots and white chocolate. Whitout chocolate, this cake is wonderfully light and fluffy - and finally counts as diet food which is not a bad thing in this particular case. However, this version is best eaten on the day it is made. Otherwise you could restore moistness by brushing it with a little syrup.
Monday, 23 June 2008
Ideas with Quark
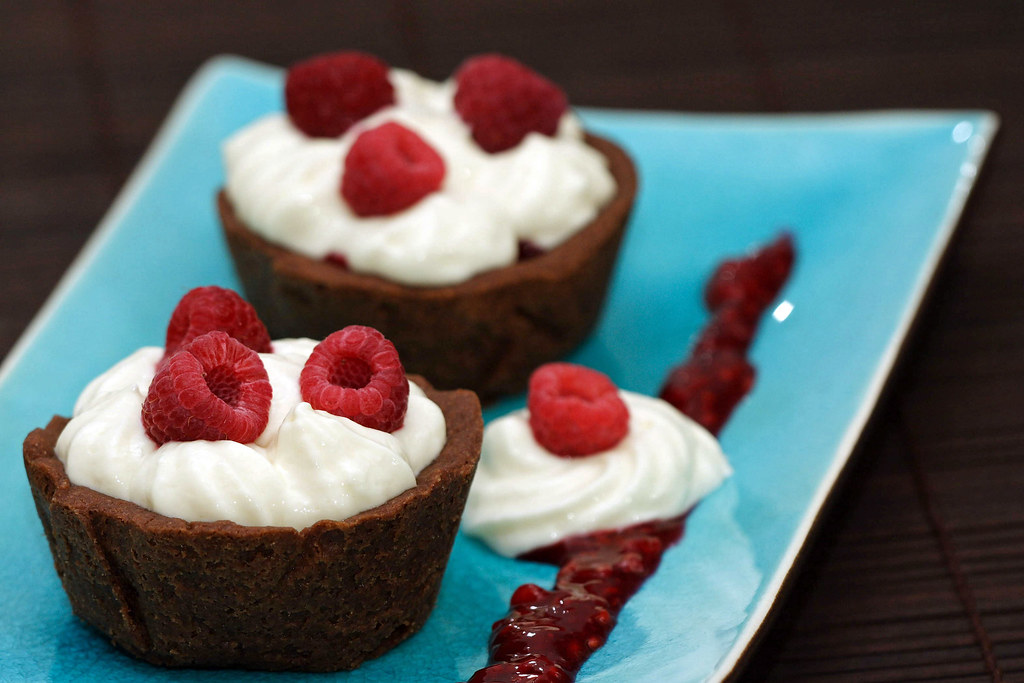
I guess it's time to see what I do with all the quark I've been making recently... The following isn't so much a recipe but rather an idea that might lead you to think up your own instant dessert. During one of the previous weekends, the urge to have a little sweet bite after dinner was positively unbearable, and I remembered having some chocolate shortbread dough and raspberries in the freezer plus newly made quark in the fridge. Dessert was only a matter of minutes.
I lined my muffin pan with small sheets of baking paper and the dough and (after a brief stint in the fridge) baked it at 175 degrees Celsius in a preheated oven (not fan-forced). Baking time varies according to size. However, once the pastry looses its shine, it's partially cooked so I then gave it another 5 minutes. Of course, these little tartelettes benefit from blind-baking but I simply poked them with a fork to deflate. Almost as pretty..;-)
Whilst the tartelette cases cooled down, I selected a few nice big raspberries to thaw on a paper towel. The others went onto the stove and got cooked with sugar and a splash of white wine to release their juices. One teaspoon of cornstarch, dissolved in some white wine for thickening. And one tablespoon of cointreau to accentuate the fruity taste.
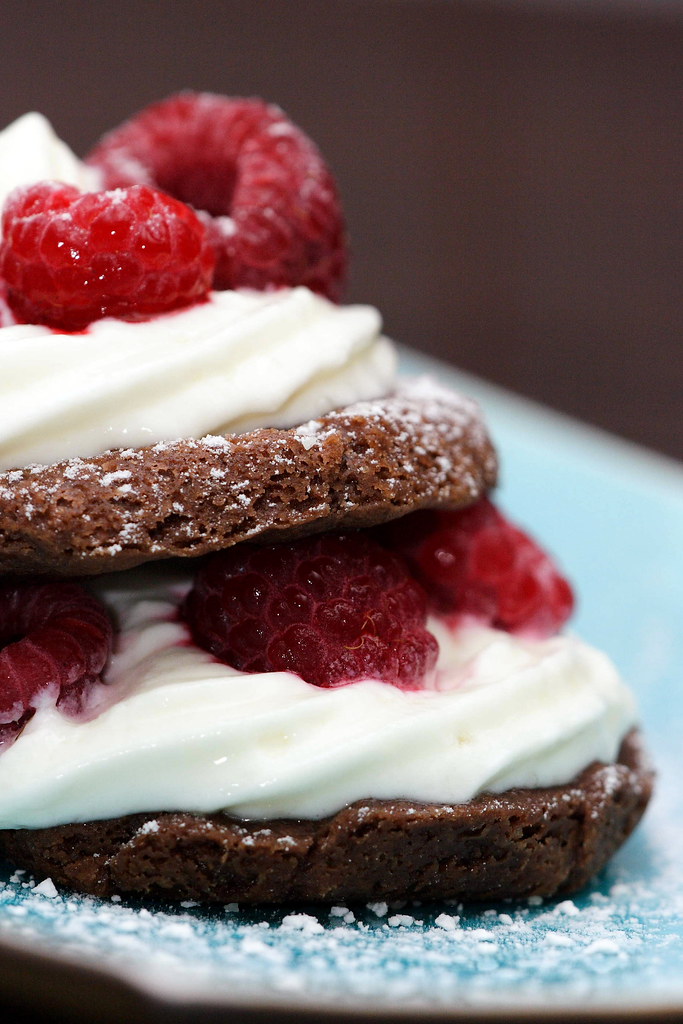 The raspberries filling went into the tartelette cases first, then the quark filling on top. It's not quite stiff enough to allow for proper piping so you might want to add some gelatin. I ended up with the Leaning Tower of Pisa but who cares anyway.
This filling actually benefits from sitting in the fridge for a day to allow the flavours to mellow. When filled the tartelettes will hold up nicely for a couple of hours but we were too greedy to wait very long..;-)
Maybe you want to give these little tartelettes a try during the next weekend? I imagine the quark filling will pair well with any kind of berry or poached fruit combined with plain, chocolate, or a nutty shortbread base.
 PS: Due to a lucky coincidence in topic, I just realized that I'm able to participate with my tartelettes in this month's "Waiter, there's something in my... Berried Treasure!" hosted by Cooksister. Well, quark in my case..;-) If you happen to make something berry-related, there's still time to take part in this event!
Chocolate Shortbread Tartelettes with Quark and Raspberry Filling
100g quark
100g fat-reduced cream cheese
1 tbsp fat-reduced cream
1 tbsp cointreau
1 tbsp vanilla sugar
More sugar according to taste
Mix everything together and sweeten to taste. It will be thick but not stiff.
(You see I tried to make a slightly healthy-version that luckily tasted just as delicious as its fatty cousin. However, if you're not trying to shed a few grams, don't hold yourself back!)
200g frozen raspberries
splash of white wine
sugar to taste
1 tsp cornstarch
1 tbsp cointreau
The yield
This filling is enough for four muffin-pan-sized tartelettes.
The source
My own invention
Wednesday, 11 June 2008
Making my own Quark - finally!

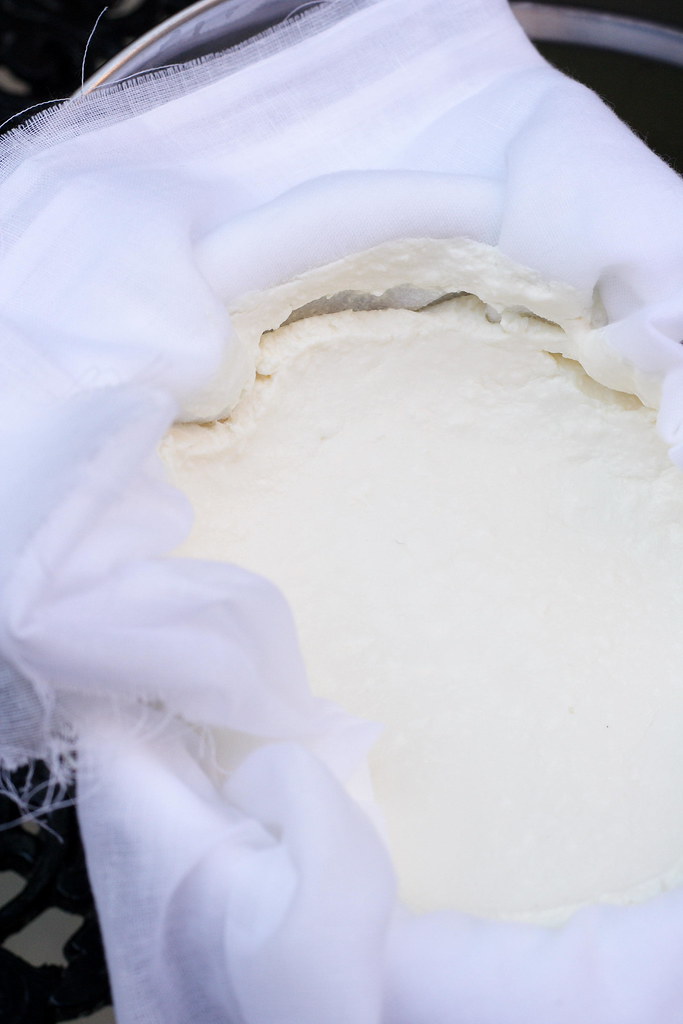 For all my constant whinging about not having German-style quark at my disposal, it has taken only about two and a half years to finally make my own. As usual, once you've started a new kitchen project that turned out much easier than you'd ever thought, you end up asking yourself why on earth... Well, no matter what, all my thanks go to Nora who gave the necessary cheese cloth to me (and it still took me a couple of months)!
Now, however, I definitely caught the quark-bug - pretty much every week since the first time, there's a big jar of milk sitting on my kitchen counter - slowly turning itself into something delicious...
 After looking around online for a while, I found this recipe which seemed to be the easiest one. Indeed, all you have to do is throwing the two ingredients together, wait for two days, heat it up a little and then let it drain. Voila, there's no more quark deprivation in this household!
The resulting quark can be used for this cake, or this cake, or maybe this cake... Or add some whipped cream and macerated berries... Or make quark souffles... Or simply use it in place of butter on toast with honey or jam... Its tangy taste will cut down the sweetness of regular desserts ever so slightly, giving it a new dimension in taste without turning it into something too tart. The possibilities are endless!
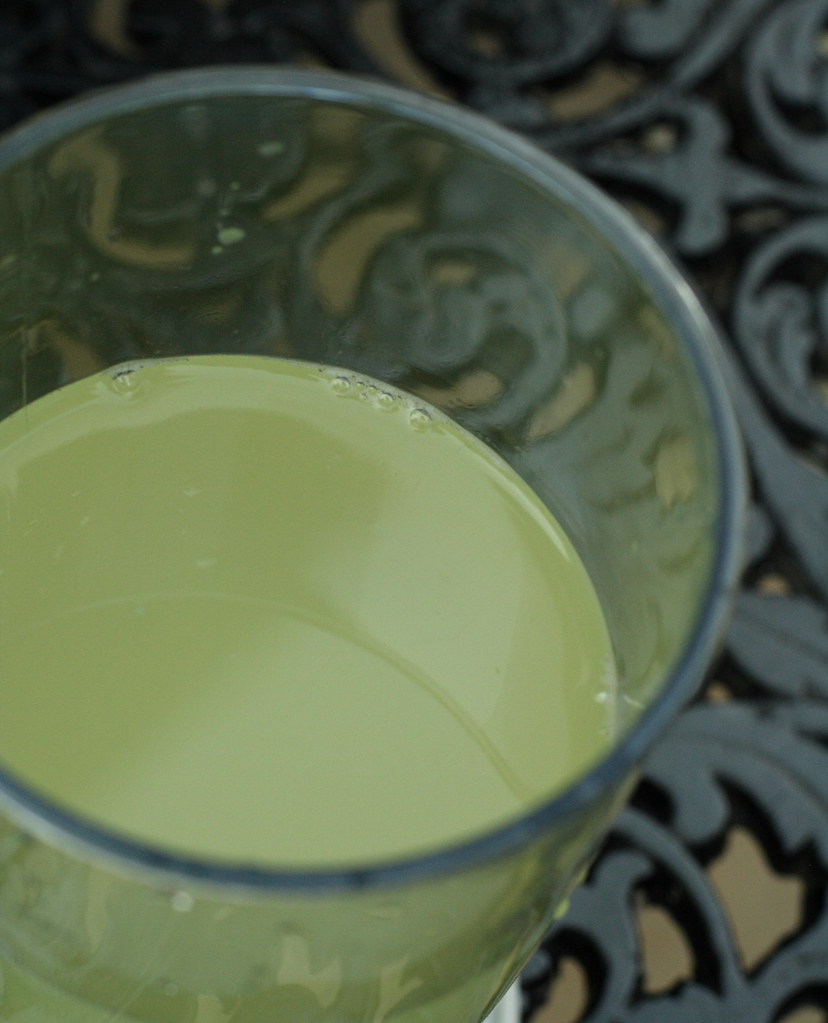 PS: You will also get a lot of whey that shouldn't go down the drain. After all, it's got all the good stuff in it, calcium, vitamins, you name it. So far, I've mainly used it in place of water when bread baking. However, I'm also planning on trying some of these super-healthy whey drinks. Apparently they're not considered yummy but I want to find out for myself.
Homemade Quark (Curd)
The ingredients
1 litre milk (whole milk or fat-reduced, long-life works as well)
60g buttermilk
equipment:
big jar with lid
fine-meshed sieve (with a hook to rest on a bowl)
cheese cloth
big salad bowl
1
Pour the buttermilk into the jar, followed by the milk (this way, you don't even have to stir it). Cover with lid and let stand at room temperature for 48 hours. The milk will have gotten thick earlier than that but I usually let it sit for full two days.
2
Heat the buttermilk-milk mixture for 1.5 to 2 hours to a temperature of 30-35 degrees Celsius. (This is roughly body temperature, to check without a thermometer simply stick your - washed - finger in and judge by yourself.)
For this step, I use my oven. However, it's pretty off and I have to use the fan-bake setting at 75 degrees Celsius to get the desired temperature - that's why you should check.
After that time, the whey should have separated from the curds and will partly float as a yellowish-greenish liquid on top.
3
Line the sieve with a cheese cloth (I use mine folded four times) and hang it on top of the bowl. There should be at least 5 centimeters of space between the bottom of the sieve and the bottom of the bowl.
Carefully pour the thickened milk into the lined sieve (it'll splatter) and let drain for 2-4 hours - depending on how firm you want the curd to be. In case it's too dry, simply stir back in some of the whey from the bowl.
4
Refrigerate curd and whey. Use within 5 days.
The source
www.marions-kochbuch.de
Saturday, 31 May 2008
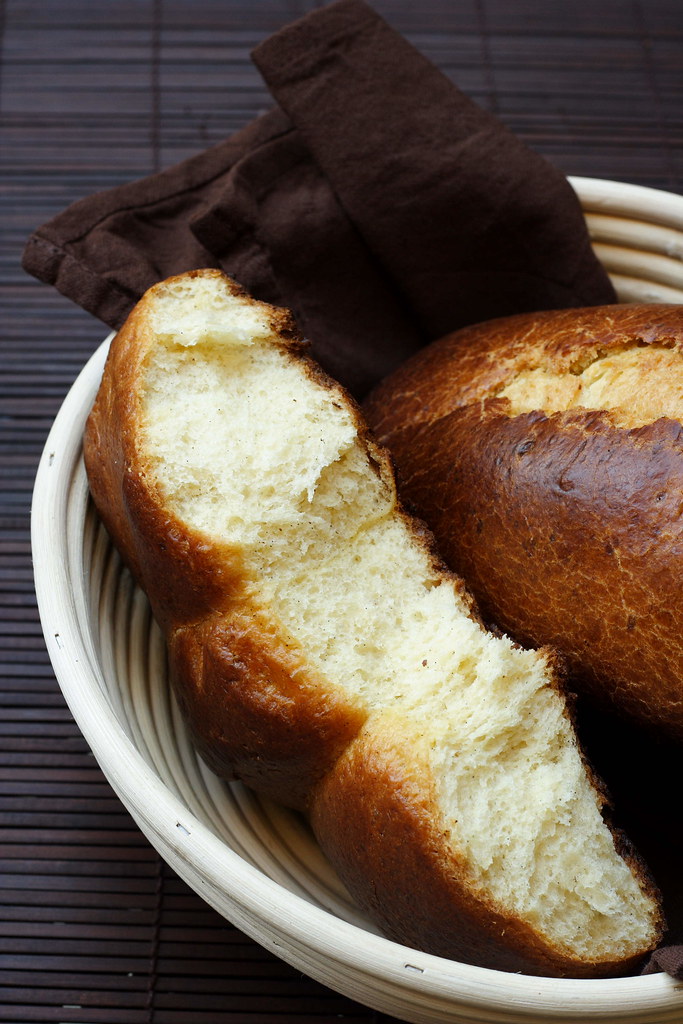
Best Brioche ever…
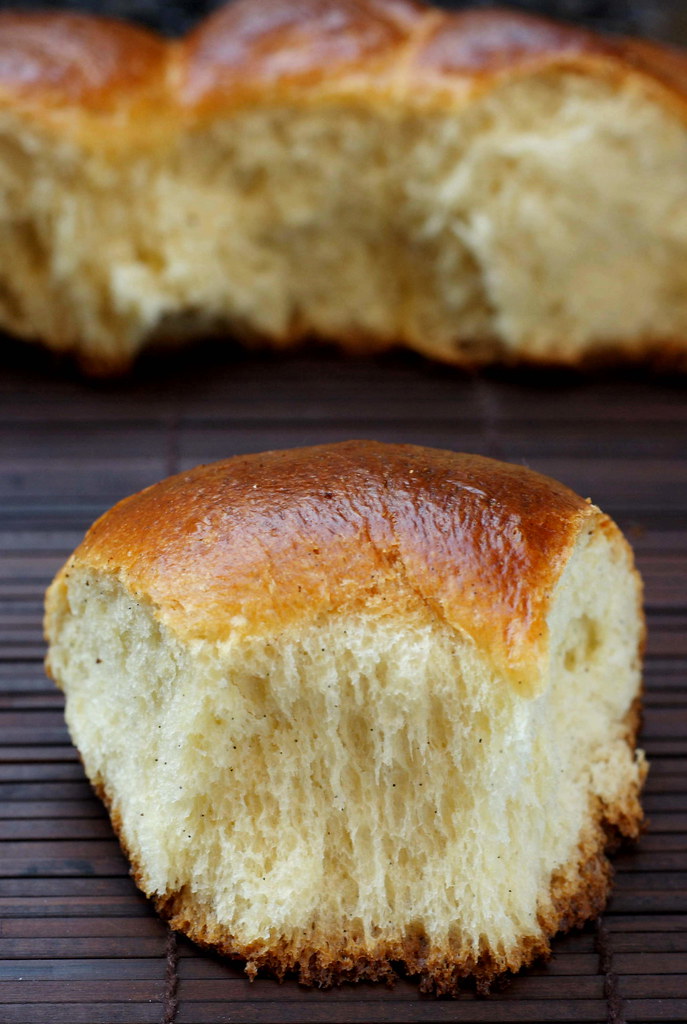
I’ve always been in love with all sorts of yeast dough, especially when having it for breakfast with a thick smear of butter and creamy honey on top. Funny enough, until today I had never made a real brioche. However, a similarbreakfast treat always was kind of a by-product when churning out trays full of sweat yeast dough covered in fruit and streusel.
Only once per year we would eat something bakery-bought that’s similar to brioche – it’s called “Spitzl”, a regional specialty known only in the Upper Palatinate (of course, this is a severe case of "same same but different" as these kinds of sweet yeast bread exist allover Europe - but let's not digress). The sweet yeast bread I'm talking about is rich, soft, and speckled with raisins. It's traditionally a present from godfather or godmother to their respective godchild given on All Saints’ Day. Naturally, the one who got the longest braid (up to a meter or so) would have the coolest godmother or godfather of all.
Whilst I wouldn’t say that the taste of these braids surpassed the flavour of our home-made goods, they had one big advantage: Their texture was singularly beautiful – when pulling apart or biting into it, the bread would separate into long strands rather than small crumbs. For some reason that was unknown to me back then, I was never able to achieve this superior texture when baking at home.
Hence my enthusiasm when I saw Melissa's recipe claiming to have solved the mystery. I followed her instructions to the t which resulted in the most shiny, satiny, velvety smooth, and super-elastic yeast dough I’ve ever made. By the way, her technique of browning the butter with the specks of two vanilla beans filled the entire kitchen with such an enticing smell that I could hardly hold myself back - all I wanted was diving right into that perfumed butter, with a big spoon, that's how good it was.
Luckily, I managed not to do anything silly and, the next day, pulled two shiny, golden brown loaves out of the oven. Unfortunately, I did not have my camera with me and had to wait a day before taking pictures. As Melissa says, the brioche is best eaten on the day it is made, and the texture will change with time. That's why the photo above doesn't really show these sublime strands of dough anymore. But I swear they were there - just go and try for yourself!
PS: Although this brioche isn't my regular breakfast fare, I wish it was and that's why I submit it to Bread Baking Day #10 - a food blogging event invented by Zorra and this month hosted by BakingASweetLife.
Thursday, 29 May 2008
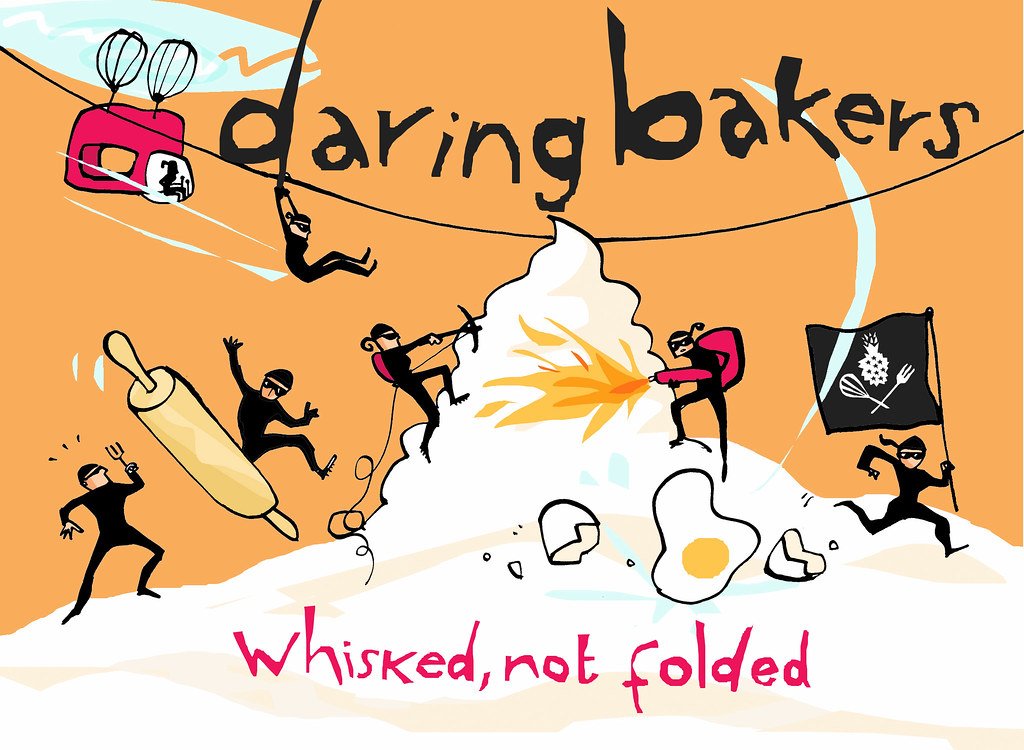
Daring Bakers do Opera Cake...
...even if it doesn't look like one... Finally, I've been able to participate once again in one of the Daring Bakers' Challenges - and what a challenge! This time, it wasn't nothing less than the classic opera cake that we had to try our hands on. Usually I would shy away from butter cream laden desserts, however, when I saw this challenge I knew instantly who to feed it to. This month, my now-husband was finishing the four-year trial called PhD and I had planned on baking cake for his research lab to eat after the public thesis defence. This super rich recipe seemed to be exactly the thing if you want to feed loads of people (but to be sure I made a red wine dark chocolate cake as well - these engineers can eat a lot).
I started with the joconde two days before - after all, I couldn't risk running late and keeping him awake while trying to finish it. The recipe worked like a charm and now I know which one to choose if I ever try again to make a Swiss roll (my one and only attempt resulted in a totally broken sponge base). The only tricky part was dividing the batter evenly as I didn't have two baking sheets. If trying again, I would probably try to get this unbelievable elastic joconde even thinner for three layers.
To moisten, I used a cointreau-flavoured syrup following the Daring Bakers' recipe.
For the filling I wanted to make a Swiss meringue butter cream, simply because I don't own a sugar thermometer and this variation seemed to be the easiest of butter creams. Luckily, again with a little cointreau as flavouring, it also turned out to be the tastiest butter cream I've ever had (and I normally don't like any of them). This recipe was easy to follow and easy to scale down to 20 per cent which all went on the first layer.
Although I would never want to eat white chocolate on its own, I love white chocolate mousse and the one from the Daring Bakers' recipe was no exception. I doubled the original amounts and used it all to cover the whole cake. As my filling to cake ratio was a bit off the mark, I decided to only pipe some of the white chocolate glaze on top instead of covering the cake or it would have been too sweet for me (besides, my glaze turned out rather stiff anyway).
Only much later (and despite reading the recipe several times) it dawned on me why my concoction wasn't looking like an opera cake at all - I had forgotten to cut the joconde properly to make a smaller cake with three layers! Too bad but I know that I wouldn't have been able to cut dainty, slim slices anyway. While cutting away, T was being questioned by his reviewers and although I was sure that he would pass the whole thing splendidly (which he did), I was the nervous one of us both (so nervous in fact that I couldn't get a decent photo). Well, better this way than the other way round...
Anyway, everyone loved this opera cake despite its homely appearance. Here you can see what it should have been looking like. Check out the recipe at the host's and the two co-hosts' blogs as well as the results of all the Daring Bakers members! This month's DB edition is dedicated to Barbara of Winos and Foodies and her event The Taste of Yellow in order to promote Lance Armstrong's LiveSTRONG foundation - that's why we changed from the traditional coffee-dark-chocolate opera to this light-coloured version!

Saturday, 24 May 2008
My first wedding..;-)
 Ok, I freely admit that it took only two requests for me to gladly display some of my wedding photos. It's already one month later and I still can't wipe this big smile off my face..;-)
The only drawback was that none of our families could come down under. However, we'll have another - bigger - church wedding back in Germany in a couple of months. Therefore, with only a couple of close friends, this celebration was quite different from your regular wedding (if there's such a thing at all). I simply loved its hand-made, improvised feel.
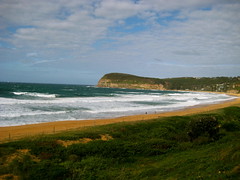
 Originally we had planned to get married directly on the beach so we booked holiday houses in a lovely small town called Copacabana Beach up the Central Coast. However, due to this year's rather cold and rainy autumn in Australia, the place didn't quite live up to its name and we opted for a more sheltered spot at the local lagoon. It still provides you with a view of the beach and plus the added benefit of an awesome sunset over the lagoon - if you're lucky, that is. Alas, the weather held up only for as long as we were posing for the formal shots.
  Just before the ceremony was about to start, we again had to swap locations - and the whole bridal party simply jumped the fence (ok, it was only a little wall, about one foot high) that surrounded the veranda of a nearby empty holiday house (we did knock on the window to check though). This lovely veranda provided a roof so we stayed all dry and could have some Sparkling Shiraz while listening to a saxophone player as planned.
We have no clue on whose property we got married in the end but we plan to go back there one day and rent this rather lovely house for an anniversary weekend...
 But maybe now I should start from the beginning as our wedding was the affair of a whole weekend: We wanted to get away from Sydney to a more secluded spot and quickly decided on a full weekend - to make it worth it. T and I arrived on the Friday afternoon in Copacabana Beach, frantically collecting keys for three houses and just making it in time to our rehearsal with the marriage celebrant. Then our guests started to trickle in and the celebration began already, fuelled by a whole vat of home brewed beer courtesy of our friends George and Nadia. I kept running back and forth to accommodate all our 30 guests in the different places, we cooked loads of spaghetti to feed everyone - and then I decided that I need to relax and went back to the house I was sleeping in. My friends Romina and Nora took care that I started to relax by giving me a foot massage and hot milo as a night cap - aaahhh, I could have that everyday...
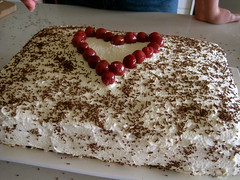 The next day, whilst most of our guests explored the area, went for a run along the beach or simply chilled out, I set to work to assemble the wedding cake, a Black Forest Cake. I had made the genoise two days in advance
 but it still took me a while to make syrup, cherry filling, and cover it all in whipped cream - I'm certainly no good at cake decorating. Anyway, after that was done, it was time to slow down, let the hair dresser do her thing and have a sip of champagne with my girlfriends. And in case anyone wondered - I did eat something during my wedding day..;-)
 In fact, I managed to stay calm most of the time - until about five minutes before T was about to pick me up. What if he didn't like the way I looked (admittedly quite different from my everyday look)? Wouldn't that spoil the whole day or maybe even make him change his mind - well, luckily I only had a couple of minutes to spend on such nonsense... Of course it was all good, and when walking towards the location of our wedding, we had the rare sensation of practically everyone, regardless of age, looking at us, cheering and waving. The people in Copacabana Beach were so nice; some even offered us a ride in their car as it had started to drizzle.
 Luckily, our friend Alex who took the official photos, managed to get lots of wonderful shots before it started to rain in earnest. And with a little spontaneity, all was fine and the wedding could go ahead. Afterwards we went back to the biggest of our three houses where the reception was being held. More sparkling red was drunk, lots of nibbles were eaten, and several speeches were given which made this occasion even a little more special for us.
  Then the main course (different spit roasts, roast vegetables, salads, and jacket potatoes) was being served by the caterer (food was a little so-so, unfortunately, we weren't able to taste-test beforehand and had to trust a recommendation). However, for a sweet-tooth like me this was all being eclipsed by the wedding cake anyway..;-)
The big advantage of a small wedding is that you really get to speak to your guests - so we talked, and ate, and drank until the wee hours of morning. The next day, T and I slept in whilst our guests took care of cooking a big Aussie breakfast on the BBQ for everyone. Then we all helped together to clean-up and the guests started to depart one by one. T and I spent the afternoon with a few friends in one of the surrounding national parks and then headed back to Sydney for a quiet end to our eventful wedding weekend.
I often wondered what would be different after getting married - if anything would change or nothing at all. Meanwhile, my life has gone back to normal but so far, the marital bliss hasn't worn out yet!
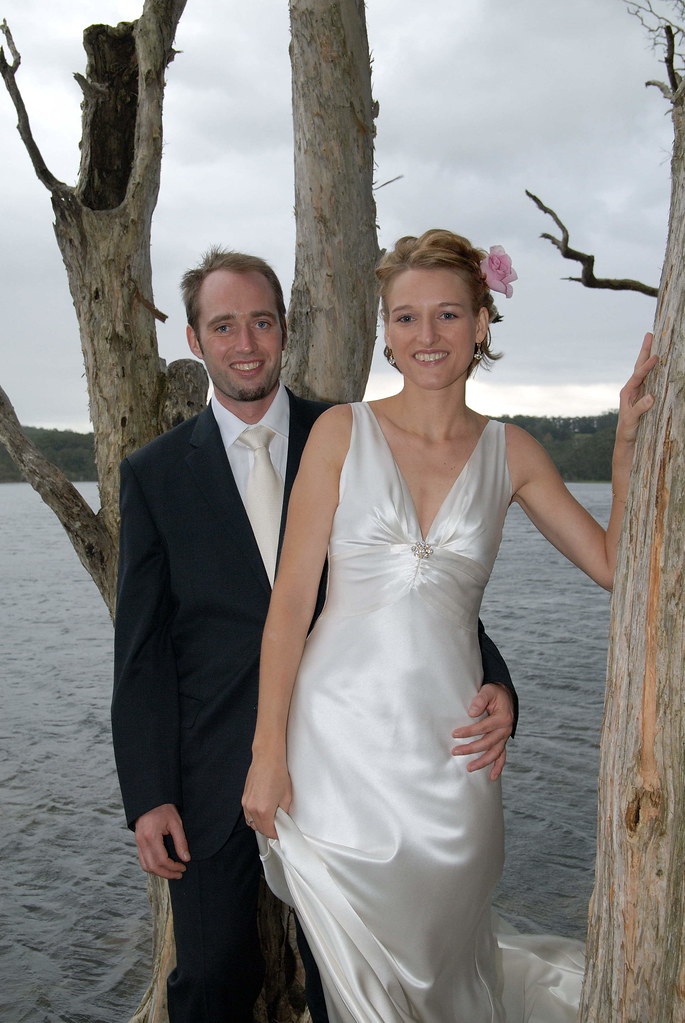 PS: Many thanks to my parents who made it possible for us to have not only one wedding but two!
PPS: Several people tried to count afterwards - I think the most reliable number was 30 guests representing 11 different nations (and that's not counting in all the Aussies with mixed parentage) - a lovely mixed crowd - and that's really what Australia stands for, in my eyes!
Saturday, 17 May 2008
Time to change...
... and to catch up on homework - to say the least! Whilst I'm busy pondering about how to give this blog a different look before (hopefully) resuming my usual blogging routine, it's high time that I display all the wonderful badges I've been given over the last few months! This post is going to get a permanent home in the sidebar under "Fame and (no) Fortune".
 Just around the time when my blog turned one year old, I got this wonderful birthday present: My dear friend and fellow blogger Nora of Life's Smorgasbord awarded me this yummy badge for being a 'droolworthy blogger'. Thank you, Nora!
 Only a little later, I was thrilled to win in several categories of Jugalbandi's Click event: My photo of floating noodles won in 'originality', made the overall second place, and got the much appreciated readers' choice award. I couldn't have been happier about the outcome!
 Earlier this year, Margot of Coffee&Vanilla nominated me for the 'inspiring food photography' award, and lucky me - I won the public online poll! Now I can proudly display this lovely badge, makes me want to start baking right now..;-)
 Around the same time, I was lucky enough to win one of the host awards at the DoesMyBlogLookGoodInThis competition. Jennifer of Bake or Break liked my soft pretzels, and I'm so glad she did! I just hope to bake more, photograph more, and blog more, so I can enter this amazing competition again.
 And last but not least, it's time to proudly display my Daring Baker's badge - check out the amazing number of daring bakers worldwide!
Just around the time when my blog turned one year old, I got this wonderful birthday present: My dear friend and fellow blogger Nora of Life's Smorgasbord awarded me this yummy badge for being a 'droolworthy blogger'. Thank you, Nora!Only a little later, I was thrilled to win in several categories of Jugalbandi's Click event: My photo of floating noodles won in 'originality', made the overall second place, and got the much appreciated readers' choice award. I couldn't have been happier about the outcome!Earlier this year, Margot of Coffee&Vanilla nominated me for the 'inspiring food photography' award, and lucky me - I won the public online poll! Now I can proudly display this lovely badge, makes me want to start baking right now..;-)Around the same time, I was lucky enough to win one of the host awards at the DoesMyBlogLookGoodInThis competition. Jennifer of Bake or Break liked my soft pretzels, and I'm so glad she did! I just hope to bake more, photograph more, and blog more, so I can enter this amazing competition again.And last but not least, it's time to proudly display my Daring Baker's badge - check out the amazing number of daring bakers worldwide!
Subscribe to:
Posts (Atom)