Google
 

Saturday 30 June 2007

"Waiter, there's something in my...dumplings!"


Well, pear, to be precise. When I read about Johanna's challenge for the June edition of the "Waiter, there's something in my..."-event, I was very happy. I had always wanted to make fruit-filled dumplings (you didn't expect me to make savoury ones, right?) but for some reason never got around to do it. And regarding the chilly temperature this past month here in Sydney, my dumplings couldn't be wintery enough.

The only problem: Plums or apricots are just not in season right now and I didn't want to shell out almost six dollars for a tiny punnet of strawberries (it's still a mystery to me that those always seem to be in season in some part of Australia). However, the pear season is in full swing right now so that was settled eventually. In the beginning I had dreamed of some wonderfully complicated filling like pot roasted pears but in order to get dinner ready at a reasonable time, I simply used big chunks of a very ripe packham pear. With a salad as a starter, these pear dumplings are a substantial meal - and when you only eat two dumplings each, it's no overindulgence. However, I don't want to stop anyone...

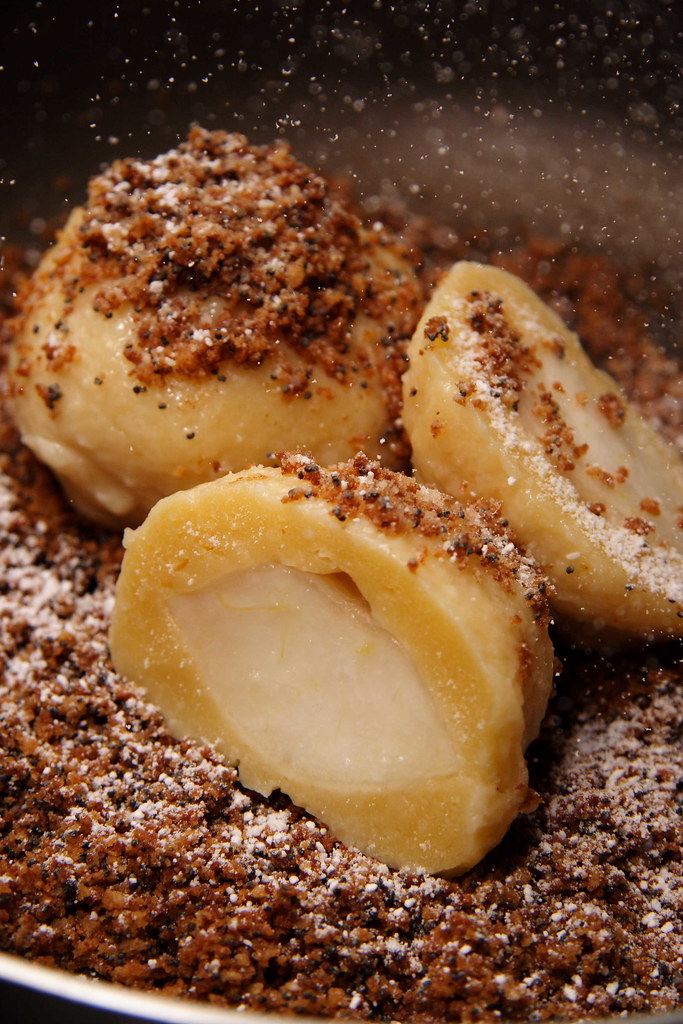
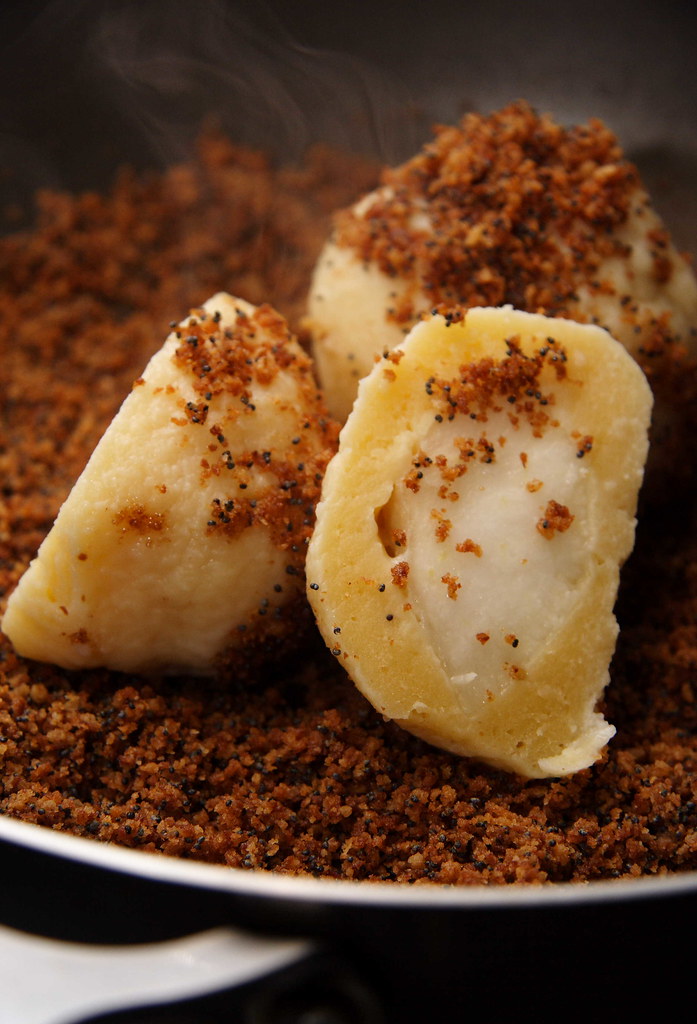
Special thanks to my boyfriend who first sneered at the idea of a sweet main meal but then helped me taking really good photos: It was his idea to picture the steam and to let it "snow". Needless to say, he ended up liking these dumplings a lot... The cooking time was just right to get sweet and soft pear centres without overcooking them. The fried breadcrumbs added texture and a nice contrast to the soft but still firm dumpling dough. Can't help it, I want more...


Pear Dumplings


The ingredients

40g butter
250g ricotta
2 egg yolks
1 pinch of salt
250g flour
6-8 tbsp milk

1 large, ripe packham pear, peeled, cored, and cut into six chunks

about 3 litres of salted water

50g butter
100g breadcrumbs
2 tbsp poppy seeds
pinch of cinnamon
pinch of mixed spice
icing sugar for dusting

1
Cream the butter, add egg yolks, ricotta, flour, and salt, mixing well.

2
If your ricotta is rather stiff like mine, you'll end up with a crumbly mixture. Add milk by the tablespoon until the dough comes together in a smooth ball. It will still be rather stiff. If your ricotta is soft, omit the milk.

3
Shape the dough into a thick roll and pop it into the fridge for 30 minutes. In the meantime, prepare the pear.

4
Boil the salted water. Cut the chilled dough roll into 6-8 slices (depending on how big your dumplings are). Flatten each pieces until it's big enough to be wrapped around the pear chunks. Make sure to pinch the seams well (which is a bit easier using naturally round fruit).

5
Carefully put the dumplings into the water and let it come to a boil. Then let the dumplings simmer for about ten minutes. They are ready when floating. Note: Make sure to stir once or twice to prevent them from sticking to the bottom. Otherwise they won't float when ready...

6
In the meantime, melt the butter in a pan. Add bread cumbs, poppy seeds, and spices. Fry until crisp, stirring frequently.

7
Turn the cooked dumplings in the breadcrumbs and sprinkle with lots of icing sugar.

The source
Adapted from Hedwig Maria Stuber: Ich helf Dir kochen

The hint
Makes 6 large dumplings or 8 smaller ones when using smaller fruit. After an entre, serve 2-3 large dumplings per person as main course. As dessert, this is enough for four people.

If you have leftovers, freeze the dumplings and the breadcrumbs seperately. To thaw the dumplings, put into cold water and let come to a boil or use a microwave.

Wednesday 27 June 2007

Craving Vanilla Custard


Sadly enough, there haven't been many posts in this month. Due to a couple of very busy days, I didn't even have time to read my favourite blogs. But even worse, I've even managed to miss the deadline for this month's Sugar High Friday... If I'm very lucky, Jennifer - The Domestic Goddess who not only invented this popular blogging event but also hosts it this time - will have mercy on me - but if not, I can't blame her...

Anyway, I still want to tell a story about one of my all-time cravings. But beware, it's not something very interesting. Most likely, most people will have made something like that ages ago: homemade vanilla custard.
However, when I was little, I thought vanilla custard came out of a box. I did know that milk does come from cows and not from the supermarket (after all, I grew up in a little village and visited said cows almost every evening). But whenever I was craving vanilla custard, my mum would just open a paper package with a flour-like mixture, stir it into milk, and after a little boiling I was a happy camper. Up to today, I still don't know anyone personally (at least in Germany) who would make it from scratch. Although it might be possible that I accidentally made something that qualifies as custard when working on a more involved dessert recipe, I haven't done it consciously - until last weekend.

Jennifer's task to create something that you crave regularly but never actually made yourself was the proper occasion to finally try my hands on my very first vanilla custard. That said, this recipe isn't particularly difficult and it was whipped up in no time. However, I felt a bit timid. Would it be able to stand up against the beloved package mix? Could I - at the ripe old age of 30 - leave my childish custard addiction behind and fall in love with the real thing?

I tasted at every stage, carefully monitoring the changes in texture, colour, and taste. And truth be told, once the egg yolks were incorporated, this custard tasted exactly like the one I was already used to (but I take care to buy the good stuff with real vanilla). Not only taste, even colour and creaminess were exactly the same. A bit startled, I folded in the egg whites. And that's where things started changing. My eggs had been too big. Whilst this foamy feather-light custard was still pretty good, it had nothing to do with my treasured memory. And it was by far too soupy to set and be inverted later (I tried and it resulted in a very unphotogenic puddle on the plate). End of the story: I guess I will still resort to my package mix - unless it's a very special occasion...


Homemade Vanilla Custard

The ingredients
750ml whole milk
100g cornstarch (if you want to invert it - the original recipe stated only 60g)
75-100g caster sugar
1 tsp vanilla bean paste
2 small eggs, separated (If you only have large eggs, use two yolks and one egg white)

Serves 6

1
Whisk cornstarch, sugar, and vanilla bean paste into roughly 150ml of the milk.
2
Bring the remainder of the milk to a boil. Once boiling, remove from heat and stir in the cornstarch mix, using a wire whisk. Move back to heat and let it come to a boil again. Let boil for at least a minute or until noticeably thickened.

3
Stir the egg yolks into the thickened milk. (I waited a couple of minutes to let it cool down a little bit - didn't want to end up with scrambled eggs). The mixture will thicken a bit more.

4
Beat the egg whites until stiff and fold into the custard.

5
Pour custard into moulds and let cool. Refrigerate until serving.

The source
Adapted from Hedwig Maria Stuber: Ich helf Dir kochen

The hint
Serve with your favourite fruity sauce. I used frozen raspberries heated up in some Cointreau with a little sugar added.

Monday 18 June 2007

Pia's Plum Tart


The plum season is gone since quite a while but I still haven't blogged about the latest result on my quest for the perfect plum cake. There has been the traditional one and the not-so-traditional one - both delicious in their own right but both not quite able to satisfy the expectations of my boyfriend. Usually, he's quite happy with the outcome of my kitchen adventures so I was really curious to know more about the superior plum cake of his mother with the mysterious "brown dough" - and I got her recipe.

It turned out that this dough was pretty similar to the pretty famous Austrian Linzer Torte which is said to be the world's oldest known cake recipe. I had never made it before so I was very intrigued and rushed to the store to get ground hazelnuts. I know, the recipe says almonds but that's where the trouble starts. To get the full taste - and the desired brown colour - the almonds need to be ground with their skin on. Unfortunately, the store-bought almond meal is completely white and I don't have a food processor to make my own. That said, the best option is using a manually operated grinder. There you'll get tiny flaky bits (instead of a uniform floury meal) which will improve the texture of all sorts of baked goods, especially flourless cakes.
Anyway, none of those options was open to me so I decided to cheat a bit and used a mixture of 50g of ground hazelnuts and 50g of ground almonds. That way, the dough was decidedly brownish.

However, this story doesn't come with a happy end - simply because I was too impatient. Once the tart started to look done around the edges, I decided that it was fully cooked through even after only half an hour in the oven. When slicing the tart, I realized that I had outsmarted myself: What had looked all right around the edges was completely undercooked in the middle. Luckily, even undercooked, the cake was still tasty albeit not at all crunchy. Now I'll have to wait for the next plum season to get the ultimate plum cake experience... If any one happens to have some plums in the freezer and wants to try this tart, please let me know about the outcome...


Pia's Plum Cake

The ingredients

150g butter
100g sugar
2 egg yolks
pinch of salt
some lemon zest (or vanilla extract, if you prefer)
150g all-purpose flour
100g ground almonds

1
Cream butter with sugar until sugar dissolves. Add egg yolks, salt, and flavouring, mixing carefully after each addition.

2
Add the flour and the ground almonds, while mixing on low speed. Once the dough comes together, shape it into a disc, wrap in plastic foil, and chill in the fridge for an hour (because the dough is quite soft).

3
Press the dough into a buttered 26 centimetres tart form (the dough will still be too soft to roll it out) and cover tightly with plums. If using frozen plums, don't let them defrost or they will get soggy.

4
Bake at 180 degrees Celsius for about an hour (and try to be patient - it doesn't matter that the edges of the cakes could get a bit dry and crumbly). Take the cake out of the oven and immediately sprinkle with cinnamon sugar.


The source
Pia's recipe

The hint
You can easily double the recipe for a whole tray of plum cake.

Wednesday 13 June 2007

Breakfast Rolls with Poppy Seeds

Whilst I'm frequently baking bread - last time with not so good results but I better be quiet, I'm still chewing on this one - bread rolls are a rare treat on our breakfast table. Mostly because of one reason: If you want to have freshly baked bread rolls in the morning, there's not much sleep to be had on this very morning. Even if you make the dough the night before and leave it in the fridge to rise, you still have to get up early to take it out, let it come to room temperature (well, I usually skip this step), shape the rolls, let them rise again, and finally pop them in the oven. Unfortunately, due to our small apartment, my boyfriend wouldn't get much sleep either. Therefore, I prefer to do the whole process the night before resulting in nice but not quite fresh bread rolls on Saturday morning. Even a quick refreshing in the hot oven never restored the ultimate crunch.

This time however, I had resolved to make Deinin's bread rolls who got the original recipe from Anne. I followed Deinin's adaptations to the letter (apart from accidentally watering down the egg wash resulting in lighter colour) and was rewarded with very tasty, chewy rolls. Half of them got eaten the same evening. The rolls were not overly crunchy but had very pleasing rustic appearance and a good, hearty bite. The other half got devoured the next morning - and miraculously, these rolls hadn't deteriorated at all! I reckon it's due to the butter they contain making for softer rolls with an obviously longer shelf life. I will definitely make them again!

PS: The only thing I wondered about was how Deinin got them big enough to fill them with Caesar's Salad. While having a nice size, mine would not have been up to that task. But maybe I suffer from a streak of bad lack regarding the whole rising business - as I said, I'm still chewing on my last loaf...

Tuesday 5 June 2007

Semolina Pudding with Rhubarb Compote

Another day with another adventure in the grocery store: Doing my daily shopping for one once during the morning, I noticed lots of shop assistants around, filling up the shelves and generally being very busy. I contemplated the possibility to ask for something I've been searching for quite a while - semolina. It looks like I've never grown out of this childhood treat that always comes in handy when I want some quickly cooked lunch that should also satisfy my sweet tooth while not being completely unhealthy. I go through a lot of that stuff.

However, stocking up on it proved to be a bit of a problem. In the supermarket next to our first flat in Sydney, I had figured out after a while that semolina was to be found in the bakers’ aisle, next to nuts and vanilla essence. My other source was small grocery shop run by people from the Balkan. Squeezing myself through the extremely narrow aisles was fun already not to mention all the incredible stuff you could find there: Preserves, canned vegetables, spices and dried fruits unknown to me. Where was I? Right, this shop had the most wonderful semolina that resulted in a very smooth and almost silky semolina pudding. What shall I say – I still miss it.

Now living closer to the central business district, I could choose between two supermarkets but hadn’t found any semolina – despite having asked for it several times. This morning, after hesitating for a little while, I decided to give it another go and approached one of the shop assistants.

"Excuse me, could you please tell me where to find semolina?” I said in my nicest I-don’t-want-to-cause-any-hassle-voice.
His answer was short: "What's that?"
"Ahem, something like cracked wheat?!" Being at a loss for words, it was the quickest reply I could think of, knowing that it wasn’t quite correct. Have you ever had to explain what semolina actually is??
The shop assistant decided to take the reasonable way and took me to a colleague hoping that he would know more about it.
“Do you know where to find semolina?” – still with my nicest I-don’t-want-to-cause-any-hassle-voice.
“What’s that?” Haven’t I heard that one before? After providing my non-appropriate explanation again, the shop assistant led me to the cereal aisle. Standing in front of the boxed breakfast with no semolina whatsoever, I realised that he had just understood the word “wheat”.
And home I went without my beloved semolina.

Okay, just to be fair to the guild of shop assistants, I should mention that shortly after this memorable encounter, I finally got some semolina. In another shop, another shop assistant proved to be exceptionally helpful: She pointed one semolina brand in the health food section and another one next to the chocolate chips – sold out unfortunately.


Semolina Pudding with Rhubarb Compote

I have to admit that I never use a recipe when making this. Using the rule of thumb, I pour some semolina into the milk. If you add the semolina to the cold milk, you’ll never end up with lumps. Stir constantly until it comes to a boil, adding more milk if necessary (it will get stiffer while cooling down). Sweeten to your liking, add a pinch of salt, some vanilla sugar, and dust with cinnamon if desired.

Serve with your favourite fruit compote. I like to caramelize some sugar before adding the fruit. Stir to coat with caramel and depending on the juiciness of your fruits add a little water. Cook until you reach the desired consistency.

This is the ratio for semolina pudding one of my trusted old-style German cookbooks presents (serves 4):

1 litre of milk (low-fat works fine but whole milk tastes better)
100g semolina

To make the pudding bit richer, add up to 40g of butter, two egg yolks, and two egg whites beaten until stiff.