Google
 

Thursday 31 January 2008

BBD#6 - Part Three

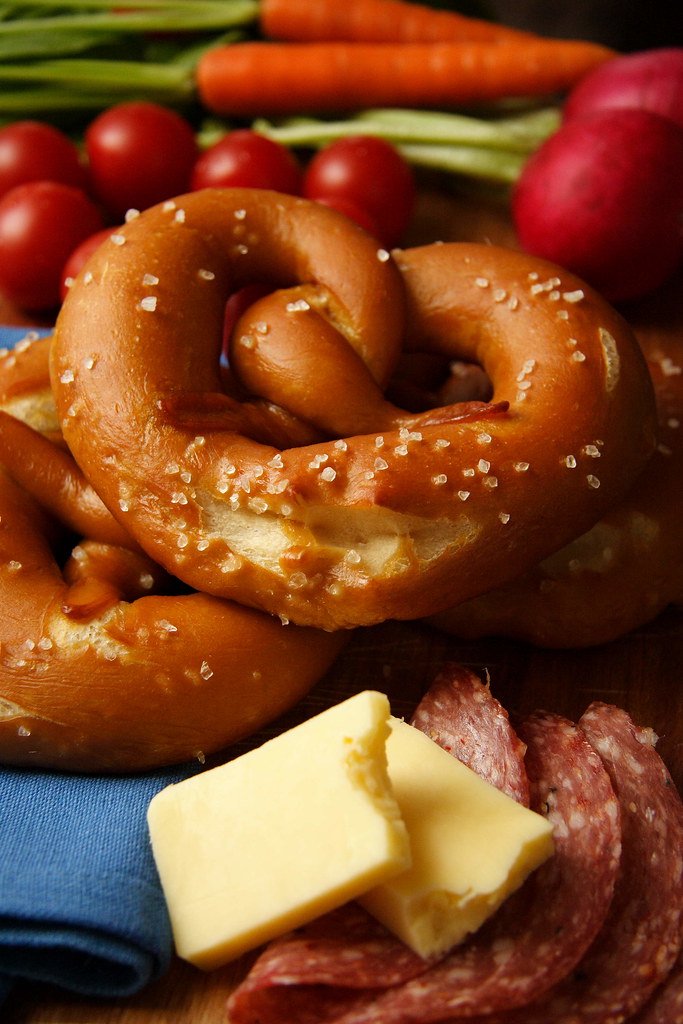
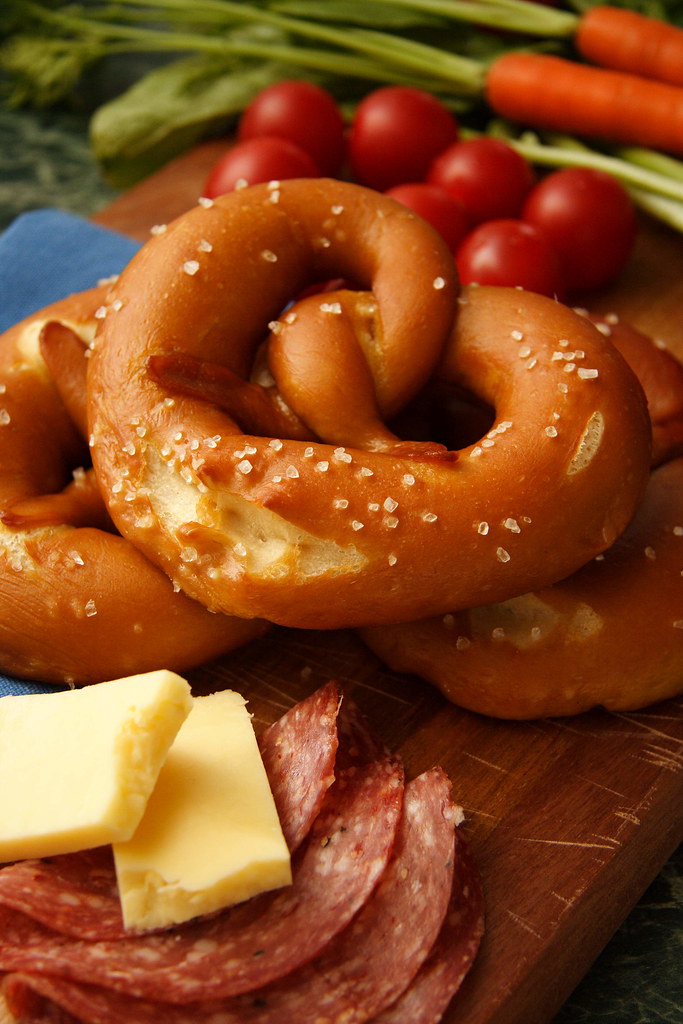
In order not to miss my own deadline, I'm finally posting my main Bread Baking Day #6 event: soft pretzels prepared with a lye solution - the way you get them in Germany! Pretzels are a very popular snack allover my home country - no matter if for breakfast, lunch, afternoon snack or dinner. You see, the Germans really like their pretzels. There are many slight, regional differences but for me, a five-star pretzel needs to have a very fine-textured, soft crumb that doesn't dry out easily whilst the surface has to be of a shiny, reddish brown colour and needs to be quite crusty.

Obviously, it's one of the typical things that an ex-pat might miss fairly soon because chances aren't very high to get the real thing anywhere outside of German-speaking countries. Luckily, in case the desire for pretzels becomes overwhelming, there is a German bakery in Sydney where one can get a quick fix. Since living in Australia, I twice tried to reproduce pretzels but both times the results had been only so-so. Fresh from the oven, they had been good enough - however almost anything that comes straight out of the oven usually tastes good.

Where would I get a proper recipe? German baking books seldom provide one as no one I know has ever bothered to make them at home. When reading Jeffrey Hamelman's "Bread - A Baker's Book of Techniques and Recipes", I found out that he actually started his career with making hundreds and thousands of pretzels. So he should know what he was talking about, right? Indeed, he does. Using a preferment not only improves the tastes but also the shelf-life quite dramatically. In contrast to pretzels made with the straight dough method that deteriorated fast once they had cooled down, these pretzels tasted in the evening as good as they had during my lunch break. The only thing that hadn't turned out a 100 percent perfect was the crust. It wasn't quite crusty enough but still well above average.

In case you're not too intimidated by handling a lye solution, please give it a try! It's not at all complicated. Most importantly, never touch the lye with your bare skin and give the kitchen a good airing during and after the process. The biggest problem will be to buy the lye. Pharmacist sell it, however, I've always gotten odd looks for this request - like I'm asking for bomb material. I've also boiled a few pretzels in a baking soda solution which is a common replacement. However, it only produced a slight yellow hue instead of the brown colour and the characteristic taste. Next time, I'll just have to improve the crust and I will hopefully get my perfect pretzel!


Jeffrey Hamelman’s Soft Pretzels

I had to convert the recipe and ended up with slightly odd numbers so don't be put off by that. Regarding the yeast, I used instant dry yeast instead of fresh. For the preferment, I've simply used a light sprinkle of yeast. If unsure, you can use a little more than that. The time to ferment will be shortened but if retarding the dough anyway, this should not impart the overall flavour.

Preferment
72g bread flour
47g water
1.5g salt
0.01g fresh yeast

Final Dough
290g bread flour
170g water
5.8g salt
7.1g fresh yeast
18g butter, soft
3.6g diastatic malt powder (I substituted a teaspoon of malt syrup)
121g preferment (all of the above)

Makes about 600g of dough (recipe could be doubled).

1
Mix pate fermentee using a wooden spoon. It should have the rather stiff consistency of finished bread dough. Let stand for 12-16 hours at room temperature. When ripe, the preferment should have doomed and just start to recede.

2 Mix the final ingredients for 3 minutes together, and then add the preferment in chunks. It will be fairly stiff. Mix for another 5-6 minutes. The dough should come off the walls of the bowl.

3
Let sit at room temperature for about two hours or until doubled in volume.

4 Divide dough into pieces of roughly 85g. Shape into cylinders and let rest for a few minutes under a cover.

5

Roll into stretches of 40 centimeters in length with the middle slightly thicker. Quickly pick up the pieces and swirl around into pretzels (or simply fold the dough strands around one another). Press ends into dough.
Note: I didn't manage to get my dough strands as long as that and ended up with slightly chubby pretzels.

6
Let proof for 30-45 minutes or until risen to 75 percent. Refrigerate for 30 minutes to allow a skin to form.
Note: Hamelman suggests that the pretzels can be retarded overnight. To do this, refrigerate after the first 20 minute of proofing. To accomodate my schedule, I decided to retard the finished dough after step 2 instead of the finished pretzels.

7
Prepare 3 percent lye solution: Put a litre of water into a pot, add 30g of lye and bring to a boil.
Note: Use gloves and take care not to get any lye solution onto your skin. Use a slotted spoon for handling the pretzels.

8
Completely submerge pretzels for about 5-10 seconds. Let drain on the slotted spoon and then transfer to the baking sheet. Quickly slash at the thicker part and sprinkle with coarse sea salt. Note: If you don't have a very sharp knife for slashing, rather use scissors instead. The cut won't be perfectly straight (as you can see) but that's better than destroying the dough structure.

9
Bake at 450 F/220 degrees Celsius in a preheated oven for 14-16 minutes.

The Source
Jeffrey Hamelman: Bread – A Baker’s Book of Techniques and Recipes

Monday 28 January 2008

Lemon Meringue Pie - another Daring Bakers' Challenge

After having missed the Christmas Challenge of the Daring Bakers - Yule Log - I was really looking forward to joining in the fun with a lemon meringue pie. However, this pie almost wasn't meant to be. At least I've learned my lesson - never start a challenge without proper preparation, e.g. checking your pantry...

The day had started off with lots of running around in the quest of the perfect wedding dress. After several days spent with a fruitless search, I am now fully convinced that either you have to be willing to spend an insane amount of money or that you have to have a terrible sense of fashion in order to simplify this matter. Not to speak of the odd looks the shop assistants give you once you mention that you're about to tie the knot in a mere three months. Getting married seems not to be for the spontaneous at heart.

Still cursing under my breath, I set to work. There was no time to lose as this pie was to be eaten with a bunch of friends at an Australia Day bbq later in the day. However, I wasn't off to a good start. For the first time ever, I had run out of all-purpose flour without restocking immediately. And the level of the sugar jar was crucially low, too. Now one might think that simply going to the shops would be the sensible thing to do. Unfortunately, a couple of days ago, my handbag got snatched away and I'm still waiting for the replacement bank card to arrive. Meanwhile, I've got to plan ahead and ask my boyfriend for cash after hours. Needless to say, I hadn't been planning ahead and had run out of cash after buying a shirt for him (the only successful thing to come out of my shopping trip).

Thus, things had to be improvised. Feeling a little bad because following the recipe and learning from the experience is the whole reason for our online baking community, I started mixing bread flour, cornstarch, and sifted whole wheat flour - simply hoping for the best. Unfortunately, I hadn't thought of sticking the butter into the freezer so it came out of the fridge still somewhat pliable. This made for a relatively soft pastry so I omitted the ice water altogether out of fear ending up with a floury mush instead of proper shortcrust pastry. Prebaking also didn't work that well with some of the pastry sticking to the foil.

Luckily, when attempting the filling, things finally took a turn for the better. The lack of granulated sugar could be helped with an ample supply of icing sugar; and I successfully cooked the lemon-filling on the stove-top. While waiting for crust and filling to cool, I cleaned the kitchen; and then another obstackle turned up - on my doorstep, literally. Despite Australia Day and despite not being announced at all, two builders stood at the front door, demanding to be let in and to repair our smoke alarm. When the alarm had been checked a week earlier, the guy hadn't bothered to mention that there was something wrong with it and that I had to expect builders turn up basically any time. So, whilst they were busy doing whatever they had to do, I finished cleaning, whipped the meringue, finished the pie, started taking pictures, and we all tried not to feel too awkward and not to be in each other's way too much.

Eventually, I finished the pie and it was very well received at the bbq despite the crumbly crust. The lemon filling was very flavourful, not too sweet and not too tart. Right after cooking, it still had a starchy aftertaste but that vanished once fully cooled and set. The meringue held up nicely for a surprisingly long time; and the only thing I have to improve is making a proper crust. To be perfectly honest, however, if pressed for time and in possession of some good-quality lemon curd, I would probably opt for the short cut I did last month: These tartlettes were made with store-bought butter puff pastry and homemade lemon curd. With only the meringue to prepare, the little beauties took only a couple of minutes to make. However, I'm glad that I did the real thing for the first time - thanks to Jen of The Canadian Baker for choosing such a tasty recipe! Check out the results of the other Daring Bakers here!

Note: After comparing my conversion with the ones The Passionate Cook did, I realized that I used only 250g of flour (which explains that there was no need for any ice water) and I used more cornstarch and more lemon juice for the filling. Considering all this conversion trouble, I consider myself lucky that the crumbly crust was the only shortcoming of this challenge..;-)

Friday 25 January 2008

BBD#6 - Part Two

In the last few days, I did some more braiding with a simple bread dough (mostly bread flour with a little rye for added flavor) using some overripe sourdough. As I had thought during the first time, braiding with unfilled strands is definitely easier. The strands keep their shape much better that way. However, I realized that the hardest part starts way before the braiding action: It isn't easy at all to get really even strands in the first place as you can see below. I will practice some more during the next weeks but my final contribution to BBD#6 will be different. Just building up the tension..;-)

Wednesday 23 January 2008

How not to shoot a hot beverage

I knew that this was a tricky one. And I was all the more determined to get it right. After scoring in several categories at the November edition of Click! - a food photography competition created by Bee and Jai of Jugalbandi - I am to be one of the judges for the January competition. With lots of plans I set to work. And surrendered after a full hour of rather unsuccessful shooting.

However, at least I learned several things on the way:

1. If you shoot a hot beverage, it should look like that. In my case, the cocoa pretty soon sank to the bottom and a skin formed on top which resulted in some very honest comments of my friends: "murky brown and boring", "looks like it's from yesterday" - well, I'll spare you the rest. Before I'm attempting hot beverages again, I'll have to buy a microwave.

2. If your main actor isn't visually attractive, don't try to pair it up with something that is. Choosing nice Scottish shortbread fingers alongside murky-brown brew is like starring in a movie alongside Julia Roberts.

3. Trying to create a nice atmosphere with several props is a good idea. However, keep in mind that the main focus of the photo needs to be evident at all times. Juggling things around won't help if you're still stuck with problem no. 2.

Luckily, there's still one week left before the competition closes (30 Jan). I'll try some more - meanwhile have a look at some of my failed attempts...


Saturday 19 January 2008

BBD#6 - Part One


Two weeks have already gone by since my announcement of hosting Bread Baking Day #6 - it's definitely time to get to work! Being the host of the event, I had decided to make several shaped breads (that means at least two if I wasn't to break the promise I only gave to myself). In the German tradition of bread making, my first contribution wouldn't even count as bread as it's something sweet. However, following the tradition of Zorra's Bread Baking Day, one doesn't have to be too strict with oneself, right?

Therefore, I present something I made for the first time ever: "Mohnzopf" - a braided sweet yeast bread filled with a poppyseed mixture (and marzipan, in this case). In the past, I rarely had Mohnzopf at all and if so, it was always bakery-bought. I liked it but never got overly excited about it. Secretly, I always wondered if there really wasn't more to this old German classic than a "that's okay" verdict. However, now I know that this recipe is just another proof of the well-known fact that home-made goods are simply the best! This sweet bread is very substantial but not heavy enough to prevent you from reaching out for seconds, or thirds, or...

But I digress, back to my theme - shaped breads. Plaiting a three-strands braid isn't especially difficult but I found it quite tricky to handle filled and rather heavy strands. Starting off with a very plump braid, the strands got longer and thinner until I could barely fit the whole thing diagonally onto my biggest baking sheet. At least the braid is tapered consistently... However, I'm planning to do something much more elaborate in terms of shaping for Part Two - stay tuned!


Mohnzopf


I've used my favourite sweet yeast dough. For 500g of flour, use only 2 eggs. You don't want this dough to be too soft to handle.


The filling

I haven't figured out where to get freshly ground poppyseeds in Sydney, therefore I've used a pre-made mix I've imported from Germany myself - you can find it here. It's so sweet that you don't have to use any additional sugar - that's why there is no sugar in the recipe. If you can get freshly ground poppyseeds, you will need to boil it in milk until it's of a thick, mushy consistency like semolina pudding.

250g Mohn-Back (ready-to-use mix)
1 egg, large
1 tbsp desiccated coconut
100g almonds, ground
25g butter, melted
1 tbsp vanilla sugar
1 pinch of salt
1 glug of dark rum (can be substituted with milk)

200g marzipan, chopped (optional)

1 egg yolk and a few tbsp of milk for egg wash (optional)

1
Mix everything except the marzipan together; the filling should be of a very thick but still spreadable consistency.

2
Divide the yeast dough into three equal portions and pull gently to shape into long strands. Roll each strand into a very long rectangle and spread with the filling.

3
On one long side of each rectangle, evenly distribute the marzipan pieces. Roll into long strands with the marzipan as the core. Make sure to pinch the seams or the filling will come out during baking.

4
Plait the three strands into a braid and tuck the ends underneath. Cautiously place the braid on a baking sheet prepared with baking paper. Let rise until the braid has grown 1.5x in size.

5
Fan-bake at 150 degrees Celsius until golden-brown (in my oven this took barely 30 minutes).

The source
Adapted from "Das Vohenstrausser Kochbuch"

The hint
The poppyseeds can be substituted with hazelnuts, walnuts or almonds.

Sunday 6 January 2008

Bread Baking Day BBD#06

When moving to Sydney a bit more than two years ago, I knew right from the start that I would have to learn how to make decent bread. After two previous visits down under, it was pretty clear that I couldn't survive on pillowy, white toast alone. Little did I know back then what a wonderful journey in the land of the bread lay ahead of me. Although I bake regularly, I'm still far from mastering this art and there is so much more for me to learn about the combination of such humble ingredients like flour, water, yeast, and salt.

I'm always eager to check out what fellow bakers are doing to turn out wonderful, crusty loaves - and one of my valuable ressources in this matter is Zorra's lovely blog 1x umrühren bitte. Zorra also created the monthly event Bread Baking Day - and I have the honour of hosting the February edition BBD#06!

We've had herbs, spices, and fruit - this time, it's all about the shape. I invite you to share your favourite recipes for all sorts of shaped breads - be it something traditional like a braided challah or a pretzel or something a little unusual like a cut-out sun, letters made out of bread dough or whatever you can think of. Although I'm most interested in hand-shaped bread, you can also use a fancy mold.
The only requirement is that you don't choose a normal loaf shape like batard, boule or baguette. However, round bread rolls count as well as long as they have something unusual like a decorative slashing pattern.

Please post about your recipe and your experiences with shaping between now and 1 February 2008. Make sure to send me an email (eva.schatz at gmail.com) until 1 Feb 08 including the name of your blog, your location, the name of your creation, and a perma link of your post. If you have a photo of your creation, please attach a small version, about 100 pixels in width.
I will be posting the round-up by 5 February 2008.

PS: Due to my Christmas trip I couldn't participate in BBD#05 with its theme of filled breads. However, I did make a filled bread in the kitchen of a New Zealand backpackers accommodation without scales, measuring cups, and modern mixing tools. Luckily, I managed not to botch our only edible Christmas item, so we were able to feast on quark stollen with almond-walnut-marzipan filling during our holiday.
Please check out all the sweet and savoury creations in Chelsea's BBD#05 round-up at Rolling in Dough!


Friday 4 January 2008

Hiking for Gourmets


Whilst it is very rewarding to cook up a storm in your home kitchen, I think it's even more rewarding to get something nice to eat while being on a hiking trip.

Rule no. 1: Always have enough food with you! This includes goodies like chocolate, a wine bladder filled with port to sip in the evening, or in case you're on a shorter hike, even a bottle of red wine. Of course, it helps tremendously if you have a supportive boyfriend fiancé who offers to carry the port or the wine bottle.

Rule no. 2: Apart from the above mentioned goodies, make sure that all the food you carry is as dehydrated as humanly possible. Otherwise your backpack will be so heavy that you will reach your destination cursing just as heavily...

While being on our Christmas vacation in New Zealand, we had only planned to do an overnight-hike in the region of Wanaka on the south island. Therefore, we didn't have too many things to prepare and, luckily, our packs weren't particularly heavy.

However, what we didn't know was that the steep climb to reach our destination, the Liverpool hut, was indeed the second steepest climb in the whole National Park. Two thirds of the hike were a rather leisurely walk through a beautiful valley, whilst the last two-and-a-half hours turned out to be quite a challenge. With both hands for support we worked our way up, using trees, roots, and rocks as handles. I was glad to be in the shade of the woods otherwise I would have had to sweat even more.

Luckily, after this ordeal, we were rewarded with the most amazing view down the valley. But I didn't stare in amazement for too long - my growling stomach reminded me of the dinner yet to be cooked.
With roughly 20 people arriving the same evening at the same 6-bunk hut, we had set up camp a bit further away, enjoying our privacy and our space. Whilst many of the hikers I've met so far lived on instant noodles and the like, we truly enjoyed our couscous with mushrooms and tuna, followed by chocolate-covered almonds. After such an exhausting day, this was a real feast!

Couscous, Hiking-style

The ingredients (per person, can be easily multiplied)

100g instant couscous
a good handful of dried and sliced mushrooms (make sure to buy sliced ones as whole mushrooms will have to be cooked for much longer)
85g tuna with sun-dried tomatoes and basil (comes in a foil pouch)
salt, pepper, your favourite spice mix

optional:
instant stock cubes
whole sun-dried tomatoes
powdered milk for a creamier texture
bottle of red wine

1
Let the mushrooms with some water (amount is according to instructions on couscous package) come to a boil and cook until mushrooms are soft and not too chewy. Add the sun-dried tomatoes at this stage, if using.
Don't forget to sip your wine while cooking!

2
Add couscous and let stand until softened. Add more water if needed.

3
Season to taste and stir in tuna. Dig in!

The hint
This also works well with salmon out of a foil-pouch or with dried beef (has to be cooked with the mushrooms to soften). Powdered tomato sauce will make a good variation.

The source
My own invention